Mic check! Hello! 1, 2, 3, 4!🎤
Can you hear me?👂 Can everyone see me clearly?👀
Raise your hand if you or your webinar attendees have ever experienced a pixelated screen on a webinar. 🙋♀️ Or perhaps your mic decided to go on vacation mid-sentence. 🌴
After creating webinars for almost a decade, I can tell you one thing: faulty equipment, especially audio, can quickly undermine your authority during a session.
But don’t worry—these problems are preventable and fixable!
Here’s a detailed guide on how to test your webcam and microphone before a webinar, ensuring you deliver a smooth, engaging, and unforgettable experience every time
How to Test Your Webcam and Microphone
Here’s a step-by-step guide on how to test webcam and microphone effectively before a webinar:
1. Check System Settings
Check the audio and video settings for your device to ensure the microphone and webcam are correctly recognized and set as the default devices.
Ensure volume levels are adjusted correctly for the microphone, and confirm that the camera is functioning by checking the video preview in your system settings.
2. Use Your Webinar Platform’s Built-in Tools
Most good webinar platforms like WebinarNinja have built-in testing tools.
- Log into your webinar platform before the session.
- Navigate to the settings or preferences section.
- Look for options like “Test Mic” or “Test Camera” to verify that both are functioning correctly.
- Speak into the microphone and watch the levels or hear feedback to ensure it’s working.
- For the webcam, preview your video and check if the lighting and angle are good.
3. Use Online Tools
If you are looking for ways on how to test laptop webcam and microphone, there are various free websites for the purpose:
- Webcam Test: Websites like webcamtests.com will allow you to preview your camera output instantly.
- Mic Test: Visit onlinemictest.com to speak into your microphone and check audio feedback.
4. Run a Test Call or Recording
- Video Call Apps: Use tools like Skype or Google Meet to initiate a test call with a friend or colleague to test both video and audio quality in real-time.
- Record Yourself: Use built-in software such as the Camera app (Windows) or QuickTime (Mac) to record a short video, which will capture both the webcam and microphone output.
5. Adjust Your Equipment
- Microphone Settings: Adjust input levels for clear audio. Position your microphone properly to prevent echo or distortion.
- Webcam Adjustments: Ensure the lighting is balanced and your background is presentable. Angle the camera to capture you clearly without being too close or far. When people ask me “how to test my webcam”, I tell them to check the equipment’s positioning and lighting in advance to avoid any issues during the call. This ensures you appear professional and well-prepared.
6. Check Connection and Compatibility
Ensure your webcam and microphone are securely connected to your computer. If you use external devices, check for driver updates or compatibility issues with your operating system.
7. Test in Webinar Mode
If your webinar platform allows, enter the webinar room in practice mode to ensure everything works as expected in the actual setup.
How to Test Microphone and Webcam on Various Platforms
Before hosting a webinar, it’s crucial to ensure that your microphone and webcam function properly to avoid technical glitches during the session.
Here is a step-by-step guide to testing your webcam and microphone on different operating systems and platforms:
Test Your Webcam and Microphone in Windows 10
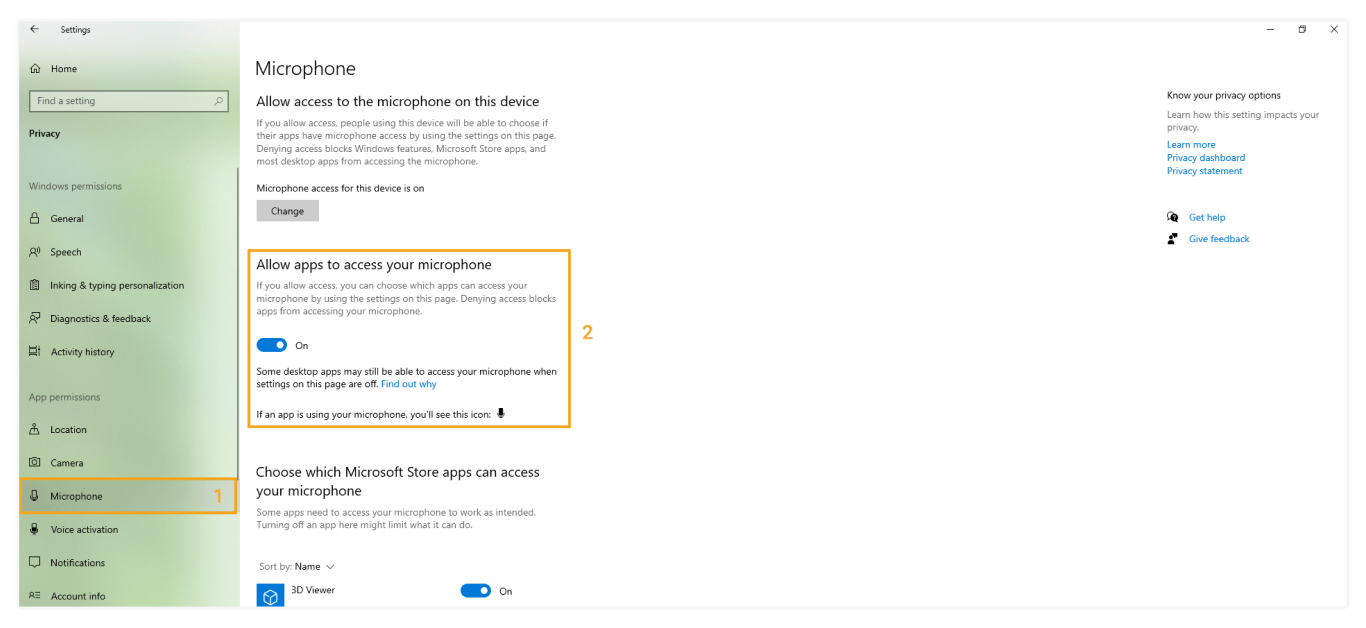
Test Your Webcam:
Most people access videos through their laptop webcam and look for ways on how to test a webcam on Windows 10. Here’s what you need to follow:
- Open the Camera App: Click on the Start menu and search for Camera. Click to open the app.
- Check Webcam Display: If your webcam is functioning, you’ll see a live feed on the screen. Ensure proper lighting for a clear image.
- Test Resolution: Go to the settings (gear icon) within the Camera app to adjust and check the webcam’s resolution.
Test Your Microphone:
- Open Sound Settings: Right-click the speaker icon in the taskbar and select Sound Settings.
- Check Input Device: Under the Input section, select your microphone from the dropdown menu.
- Test Microphone: Click Test your microphone and speak into it. A soundbar should move, indicating that the microphone is working.
- Adjust Volume: If necessary, adjust the input volume slider to optimize sound levels.
Test Your Webcam and Microphone for macOS
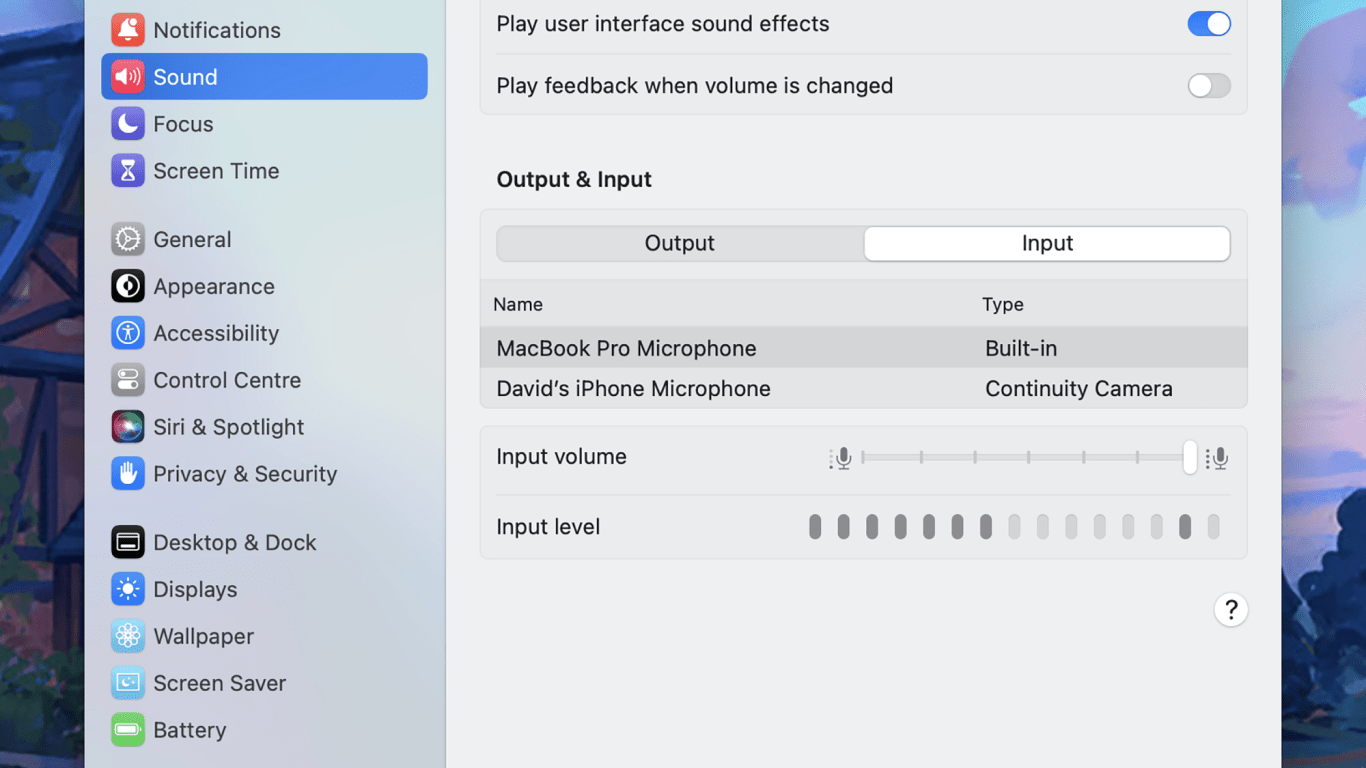
Test Your Webcam:
If you are looking for ways on how to test webcam on Mac, here are the steps you need to follow:
- Open FaceTime or Photo Booth: Launch either the FaceTime or Photo Booth app from your Applications folder.
- Check Webcam Feed: If the webcam is working, you will see yourself in the app’s video feed.
- Adjust Lighting: Ensure the lighting in your surroundings is optimal for the best video quality.
Test Your Microphone:
- Open System Preferences: Click on the Apple icon in the top left and select System Preferences, then Sound.
- Check Input: Click the Input tab to see a list of connected microphones. Select your preferred microphone.
- Test Volume: Speak into the microphone, and you’ll see the input level adjust accordingly. Adjust the input volume slider if needed.
Test Your Webcam and Microphone for Zoom
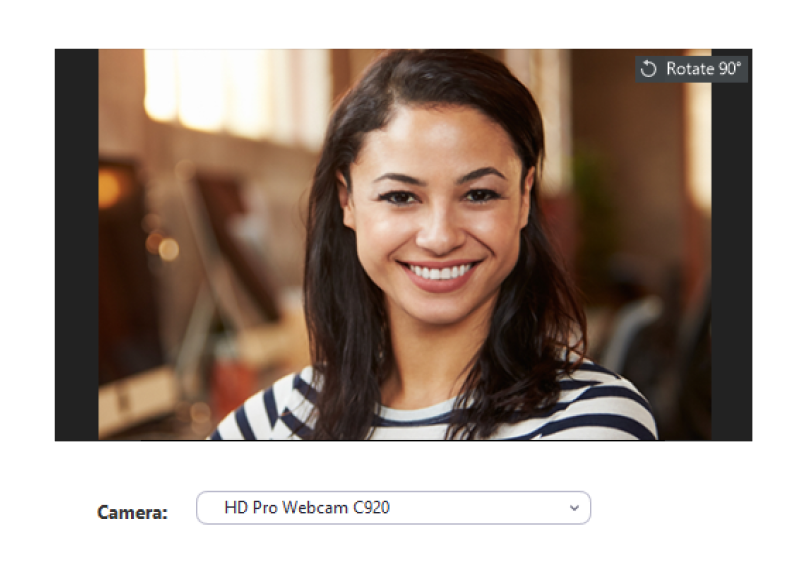
Test Your Webcam:
To test your webcam on Zoom:
- Open Zoom: Launch the Zoom application.
- Go to Settings: Click on your profile picture in the top-right corner and select Settings.
- Test Webcam: Navigate to the Video tab and ensure your camera is selected. A preview should display your webcam feed. You can adjust video settings if needed.
Test Your Microphone:
- Test Audio in a Meeting: Click the Audio tab under Zoom’s settings, then click Test Mic. Speak into the microphone, and Zoom will play back your voice.
- Adjust Settings: Make sure the correct microphone is selected, and adjust the input volume using the provided slider.
Test Your Webcam and Microphone for Google Meet
Test Your Webcam:
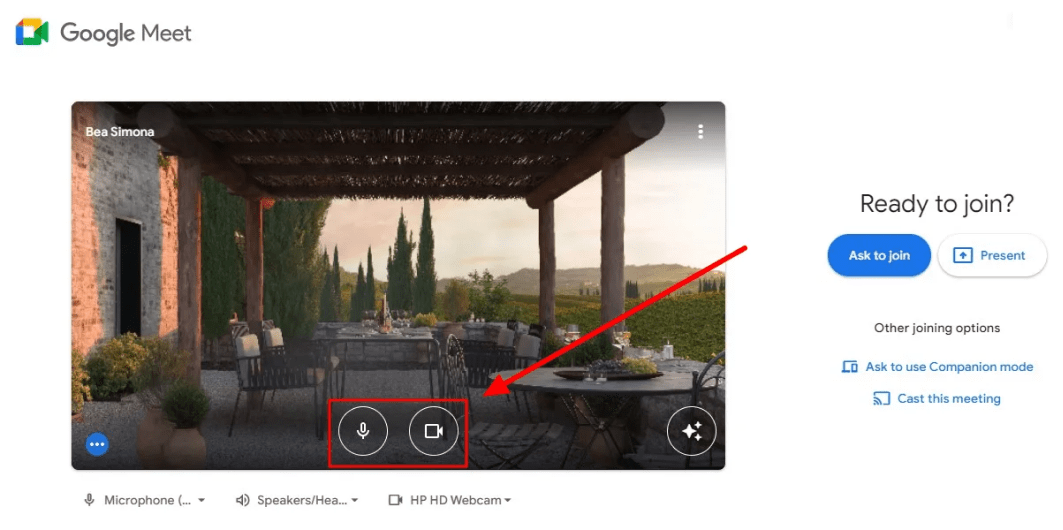
It’s easy to test your webcam and microphone on Google Meet. All you need to do is:
- Open Google Meet: Go to Google Meet (meet.google.com) and either start or join a meeting.
- Check Camera: Click on the Camera icon in the lower-left corner. If working correctly, your video will be visible to you and other participants.
Test Your Microphone:
- Test Microphone Before Joining: On the preview screen before joining a meeting, speak to ensure the microphone is picking up sound (green dots will appear).
- Test During Meeting: If your microphone is working, other participants will be able to hear you. Click the More options (three dots) button and go to Settings > Audio to test or switch devices.
Test Your Webcam and Microphone for Microsoft Teams
Test Your Webcam:
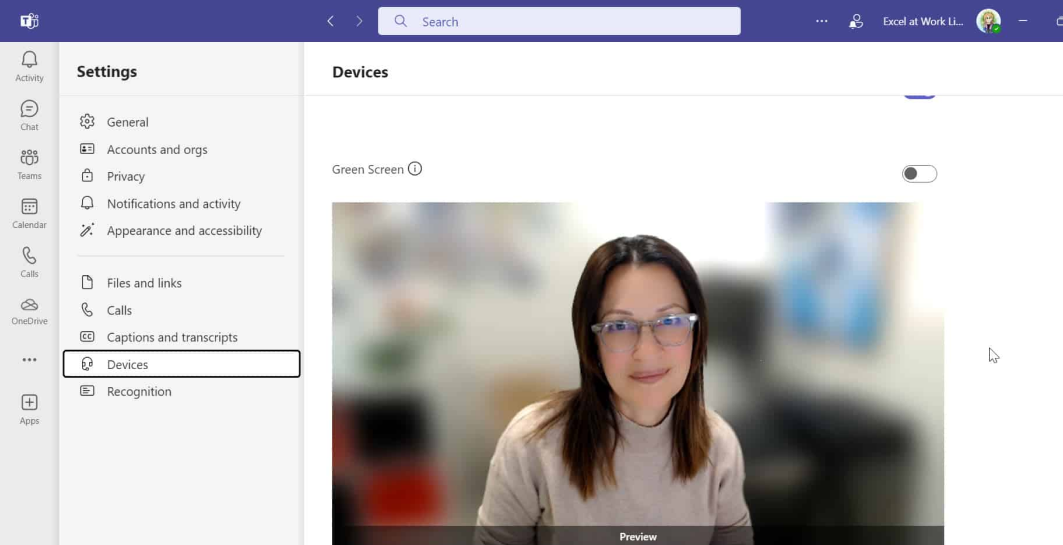
- Open Microsoft Teams: Launch Teams and click on your profile picture, then select Settings.
- Go to Devices: In the Devices section, select the camera under the Camera option. A preview window will show your webcam feed.
- Test and Adjust: Make sure the lighting and framing are good. Adjust your video settings if necessary.
Test Your Microphone:
- Test Audio Before a Call: In the Devices section under Settings, select your microphone and adjust its volume.
- Test During a Call: Join a meeting, and check the sound settings by clicking on More options (three dots), then Show device settings. You can change the microphone input from this menu.
Test Your Webcam and Microphone for Chrome
Test Your Webcam:
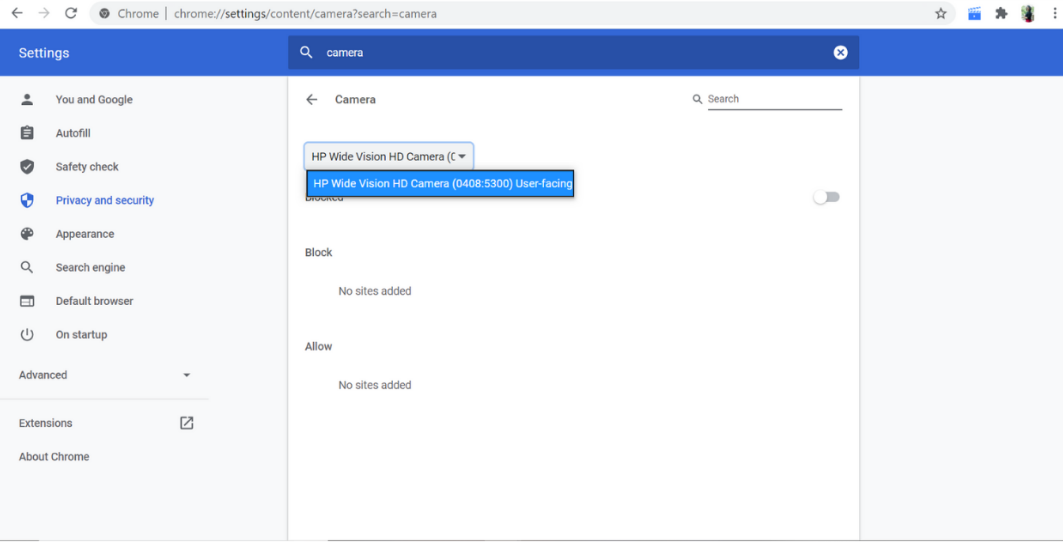
If you are looking for ways on how to test a webcam on PC, using the Google Chrome browser, here is what you need to follow:
- Open Chrome: Launch Google Chrome and type chrome://settings/content/camera in the address bar.
- Choose Camera: Ensure the correct camera is selected, and test it by opening any video-calling platform (e.g., Google Meet or Zoom) to see if your webcam is functioning.
- Allow Permissions: Ensure that Chrome has permission to access your camera in the site-specific permissions settings.
Test Your Microphone:
- Open Microphone Settings: In Chrome, type chrome://settings/content/microphone in the address bar.
- Choose Microphone: Select your microphone from the dropdown menu.
- Test in App: Open any web-based app like Google Meet or Zoom to check if the microphone is working correctly. Ensure Chrome has microphone permissions in the app.
How to Troubleshoot your Webcam & Microphone for Webinars
Technical glitches can distract your audience and reduce the overall effectiveness of your presentation. To avoid these, here’s a guide to troubleshooting your webcam and microphone issues and ensuring everything runs smoothly.
1. Verify System Settings to Ensure Device Recognition
Check your operating system’s settings to confirm that your webcam and microphone are selected as the default devices. This ensures they will be recognized and function properly during your webinar, avoiding last-minute technical issues.
2. Update Drivers for Better Performance and Compatibility
Keeping your webcam and microphone drivers up to date ensures they work smoothly with your system and any webinar platform. Outdated drivers can cause malfunctioning or incompatibility, so download the latest versions from the manufacturer’s website to prevent disruptions. You can easily learn how to test if the webcam works by using your system’s built-in camera app or a third-party tool to ensure everything functions as expected.
3. Restart Devices to Fix Minor Issues Quickly
Restarting your computer and disconnecting your webcam and microphone can resolve many minor software or hardware glitches. This simple step refreshes your system, allowing your devices to function properly again.
4. Test in Other Apps to Identify the Source of the Problem
Testing your webcam and microphone in other applications, like a video call or camera app, helps you determine whether the problem is hardware-related or specific to the webinar platform. If they work elsewhere, the issue may lie in the platform settings.
5. Adjust Privacy Settings to Allow Device Access
Some systems block webcam or microphone access for privacy reasons. Go into your privacy settings and ensure your platform or browser has permission to use your devices, preventing the platform from being blocked during the webinar.
6. Check Connections to Prevent Hardware Malfunctions
For external devices, ensure that all cables are securely connected. If you experience issues, try different USB ports or replace any damaged cables. This helps eliminate physical connection problems that could disrupt your webinar.
7. Close Other Programs to Avoid Device Conflicts
Running multiple programs that use the webcam or microphone at the same time can create conflicts. Close unnecessary apps to free up the devices for your webinar platform, ensuring smooth operation without interruptions.
8. Adjust Audio Settings to Improve Sound Quality
Poor audio can ruin a webinar. Check your system and platform settings to adjust the microphone’s input volume and sensitivity, ensuring your voice is clear and free from distortion or feedback.
9. Reinstall Software to Fix Persistent Issues
If you encounter recurring problems, uninstall and reinstall the webinar platform or browser you’re using. This refreshes the software and eliminates corrupted files, resolving any persistent device recognition issues.
10. Test Everything Early to Ensure a Smooth Webinar
Run a test session in advance to ensure your webinar equipment works perfectly. This allows you to troubleshoot any issues early on and be confident that everything will run smoothly during your live session.
Deliver Flawless Webinars With Quality Webinar Equipment
Testing your webcam and microphone before delivering a webinar is a crucial step to avoid unexpected technical hiccups that can disrupt your flow and negatively impact your audience’s experience. Regular equipment checks ensure that your communication is seamless, keeping your audience engaged throughout the session without any glitches.
Beyond just testing, using a reliable webinar platform like WebinarNinja simplifies not only the testing process but also the overall equipment management. Its intuitive features streamline the preparation phase, allowing you to focus on delivering an engaging and polished presentation.
Want to host a webinar for free?
Use WebinarNinja to teach, improve marketing, and grow your sales.


