Traditional product demos still fail the same way in 2026: the presenter talks, the audience watches, and the buyer leaves with a polite “looks great” that never turns into action.
A webinar product demo flips that dynamic. It is live or on-demand, structured like a story, and built to drive participation rather than push features. Wheechnical setupn I build these well, I see two immediate wins: people stay longer, and the next step (trial, call, activation) feels like the natural conclusion rather than a sales ask.
This guide walks you through a repeatable framework, with templates, technical setup, metrics, a more detailed problem-fix section, and tool examples. Here’s what you will learn:
- Build a webinar product demo around one persona, one promise, and one workflow
- Add interaction without turning the webinar into chaos
- Track what matters so each run improves instead of starting from scratch
Let’s start with the fundamentals:
What Is a Webinar Product Demo?
A webinar product demo is a live, automated, hybrid, or on-demand webinar that shows how a product solves one specific problem through a guided workflow, proof points, and audience interaction. It helps prospects understand value faster, compare fit more confidently, and move toward a clear next step such as a trial, consultation, or activation.
In 2026, buyers expect relevance quickly, and a growing share watch on mobile or on-demand rather than at a desktop during the live session. According to ON24’s 2024 Digital Engagement Benchmarks Report, 44% of total webinar viewers watched on-demand after the live date – meaning nearly half your demo audience will never see it the way you rehearsed it. That is a strong reminder that your demo needs to be readable and navigable on a small screen, not only on a big monitor.
To keep the category clean in your mind, I like this simple mental model:
- A standard sales demo is usually 1:1 and deeply customized
- A traditional webinar is often educational and presenter-led
- A webinar product demo sits in between, scaling persuasion while still feeling personal
Now, it’s time to build the actual experience from the inside out. A strong step-by-step plan keeps your demo clean, repeatable, and easier to improve after each run.
How to Create an Interactive Webinar Product Demo: Step by Step
When I build a webinar product demo that performs, I do not start with slides. I start with the outcome. I ask myself one question first: what should the audience understand, believe, or do by the end of this webinar?
That answer shapes the whole session.
To create an interactive webinar product demo, start with one audience, one problem, and one promised result. Then build the webinar around a short workflow, useful interaction points, a visible proof moment, and a CTA that feels like the natural next step.
A strong webinar product demo usually follows this path:
- Problem
- Workflow
- Proof
- Next step
That structure keeps the webinar focused, easier to follow, and more useful for the viewer. If that arc breaks, the session starts feeling like a feature tour. If it stays intact, the webinar feels practical and persuasive without sounding pushy.
Below is the process I use to keep demos clear, interactive, and conversion-friendly.
Step 1: Clarify One Persona, One Problem, and One Win
The fastest way to weaken a webinar product demo is to make it for everyone. The broader the audience, the more generic the message becomes.
So I always begin by narrowing three things:
- Who is this webinar for?
- What problem are they actively trying to solve?
- What is the one result they should walk away believing is possible?
That result is your win. It needs to be specific and useful. Good demo wins sound like this:
- Launch a training course faster
- Reduce manual webinar follow-up
- Create a branded registration page without design help
- Get a new employee through onboarding without confusion
- Connect one key integration and start using it immediately
Then comes the part many teams skip. I choose the one workflow that proves that win. That workflow becomes the spine of the whole demo.
Before you build anything, write this down:
- Primary audience: Who is this webinar for?
- Main problem: What is frustrating them or slowing them down?
- Promised win: What will they see, learn, or accomplish by the end?
- Core workflow: What short sequence proves that win?
- Best next step: What should they do after the webinar?
Example
Let’s say the webinar is for small B2B marketing teams.
- Problem: Webinar follow-up is manual and inconsistent
- Win: Build a repeatable lead-nurturing workflow
- Core workflow: Create the webinar, add a poll, segment attendees, and send the right follow-up automatically
That kind of focus sharpens the whole session.
Step 2: Craft a 30-Second Hook That Makes the Right People Stay
The first 30 seconds decide whether people keep watching.
I do not treat the opening like a welcome speech. I treat it like a filter. The right viewers should immediately feel, “Yes, this is for me.”
A good hook does three things fast:
- names the pain
- shows that you understand it
- promises a useful outcome
It should not start with:
- a long company introduction
- your brand story
- a generic agenda slide
- a list of features
It should start with relevance.
A simple hook pattern
If you are dealing with [problem], and it is creating [cost or frustration], this webinar will show you how to fix it in a practical way.
Example hooks
“If your team is running webinars but losing momentum after the event, this session will show you how to turn one webinar into a repeatable product demo funnel with better engagement, stronger follow-up, and a clearer next step.”
“If onboarding new hires still depends on scattered documents and repeated explanations, this session will show you how to build a guided training workflow that new employees can actually finish without getting lost.”
Quick test for your hook
Ask yourself:
- Would someone understand who this webinar is for?
- Would they understand why it matters?
- Would they know what they will get from staying?
If the answer is no, the hook still needs work.
Step 3: Build the Demo Around One Workflow, Not a Product Tour
This is where many webinar demos start losing people.
Most viewers do not want a full tour of the product. They want to know one thing: can this product help me do the thing I care about?
That is why I build demos around a workflow, not a list of features.
A reliable demo structure looks like this:
- Start state: What is broken, messy, slow, or unclear right now?
- Desired state: What should success look like instead?
- Workflow steps: What actions create the shift?
- Proof moment: Where does the outcome become visible?
- Next step: What should viewers do if they want the same result?
Example
Let’s say I am demoing a webinar platform.
Instead of opening every menu and showing every feature, I would show one complete use case:
- Create the webinar event
- Customize the registration page
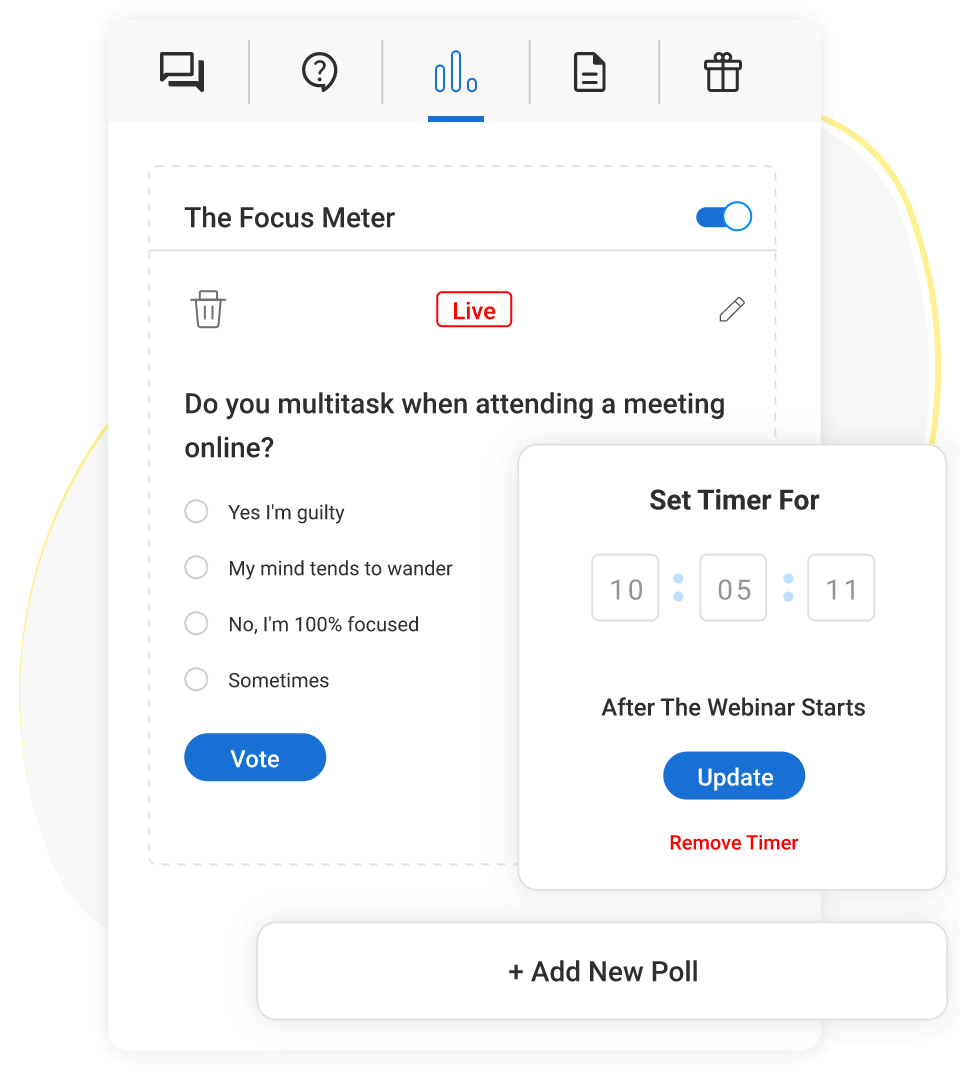
- Add one poll for live engagement
- Show automated replay delivery
- Show where clicks or conversions are tracked
Now the audience sees a system in motion, not a random tour of screens.
A good rule to follow
Keep the core demo inside three to five major steps. According to Wyzowl’s 2026 State of Video Marketing report, based on 266 respondents surveyed in late 2025, 71% of marketers say videos between 30 seconds and 2 minutes are most effective, and 63% of consumers say a short video is their preferred way to learn about a product or service. That preference carries directly into demo webinars: audiences want to see the workflow proven, not toured.
If your workflow is bigger than that, split it into two groups:
- Must show
- Nice to show
The must-show path becomes the main demo. The rest can go into Q&A, a follow-up email, or a deeper session.
Also, narrate outcomes, not clicks
Instead of saying:
“Now I’ll click this tab and open this setting.”
Say:
“Now I’m setting up replay delivery, so everyone who registers gets the right follow-up automatically instead of the team sending emails by hand.”
That makes the demo easier to follow because you are translating the interface into a real-world outcome.
Step 4: Design Interaction That Supports the Demo Instead of Interrupting It
Interaction should feel useful, not noisy.
I usually plan interaction at three points because that is enough to keep the audience active without turning the webinar into chaos:
- Early
- Middle
- Late
Each one has a job.
Early interaction: get attention and context
A poll in the first few minutes works well here.
Example:
What is your biggest webinar challenge right now?
- Getting registrations
- Keeping attendees engaged
- Following up after the webinar
- Proving ROI
Then use the result out loud.
For example:
“I can already see follow-up is the biggest issue for a lot of you, so I’m going to pay special attention to that part of the workflow.”
That one sentence makes the session feel more personal.
Mid-webinar interaction: keep people mentally present
This is where I like a chat prompt.
Example:
“Drop your role in the chat and tell me whether you run live, automated, or hybrid webinars.”
That gives you the language and context you can use in the next example.
Late interaction: control Q&A direction
Before opening questions, guide the room.
Example:
“We can go deeper into follow-up automation, analytics, or attendee engagement. Put the one you want first in the chat.”
This keeps one person from pulling the whole webinar off-track.
The main rule for interaction
Every interaction needs a purpose.
If you ask a question, use the answer. If the answer changes nothing, the interaction will feel decorative.
Good interaction helps you:
- reduce uncertainty
- personalize examples
- keep attention high
- guide the final section of the webinar
Step 5: Create a Proof Moment That Makes the Value Feel Real
A demo becomes persuasive when the audience can actually see the value.
That is the role of the proof moment.
I think of it as the point where the viewer stops imagining the benefit and starts seeing it.
A proof moment can be:
- a completed registration page
- a launched course
- a triggered automation
- a clean dashboard result
- a before-and-after comparison
- a report that shows activity or progress
- a visible reduction in manual work
Example
If I am demoing webinar marketing software, the proof moment might be when I show that attendees who answered a poll were automatically segmented and sent the right follow-up email.
If I am demoing an LMS, the proof moment might be when I show that a manager can instantly see:
- Who completed training
- Who is behind
- What reminders went out automatically
A useful way to think about proof
Try to include two kinds of proof:
- Proof that the workflow works
- Proof that the workflow leads to a meaningful result
That second one matters a lot. People do not just want to know that a feature exists. They want to know that using it improves something real.
Keep the proof moment easy to see
Your proof should be:
- visually clear
- simple to understand
- readable on a small screen
- directly connected to the promised win
If viewers have to work hard to understand the proof, it will not land properly.
Step 6: Make the CTA Feel Like the Obvious Next Step
A CTA works best when it feels like a continuation of the webinar, not a sudden sales turn.
This is where many webinars lose momentum. The presenter proves a useful result and then ends with something generic like:
- Book a demo
- Contact sales
- Learn more
That often feels disconnected.
I prefer using:
- one primary CTA
- one secondary CTA
Why this works
- The primary CTA is for viewers ready to act now
- The secondary CTA is for viewers who are interested but not ready for a call or trial
Example
If the webinar showed how to build a repeatable webinar funnel:
- Primary CTA: Start a free trial and build your first webinar funnel
- Secondary CTA: Download the setup checklist and review the workflow with your team
If the webinar showed how to streamline onboarding:
- Primary CTA: Start building your onboarding workflow today
- Secondary CTA: Get the onboarding template and map your current process first
That way, you capture both high-intent and lower-intent viewers without watering down the message.
CTA placement matters too
I like placing the CTA in two spots:
- once right after the main proof moment
- once again at the end after Q&A
That gives people two natural moments to act.
Step 7: Rehearse Like You Are Testing a System
A smooth webinar is rarely the result of charisma alone. It usually comes from preparation.
When I rehearse, I am not trying to sound impressive. I am checking whether the system holds up.
These are the questions I test:
- Can I complete the workflow in the promised time?
- Is the screen share readable on mobile?
- Is my sample data realistic but still clean and easy to understand?
- Do the interaction points feel natural?
- Do I have a backup if something breaks?
My short rehearsal checklist
- Can I deliver the hook in under 30 seconds?
- Can I complete the core workflow in 7 to 12 minutes?
- Does every interaction moment have a clear purpose?
- Is the proof moment visually obvious?
- Are the slides and screens readable on smaller devices?
- Do I have a backup video, PDF, or alternate path?
- Can a co-host handle chat, questions, or technical issues if needed?
One of the smartest things you can create
Build a golden demo workspace.
That means one clean, stable version of your demo environment that you do not casually change before every session.
It helps you:
- reduce surprises
- rehearse more consistently
- keep the experience repeatable across runs
Step 8: Turn One Webinar Into a Reusable Resource
A strong webinar product demo should not live once and disappear.
I always look at a webinar as the start of an asset library, not the end of a single event.
Once the webinar is done, you can turn it into multiple useful pieces:
- short demo clips
- an on-demand replay with chapters
- a blog post
- a follow-up email sequence
- a help article
- an FAQ section
- a checklist
- a planning template for the next campaign
Example
A webinar about building a product demo funnel can easily become:
- a short clip on the registration page setup
- a short clip on follow-up automation
- a checklist for webinar launch prep
- a blog section on webinar engagement strategy
- a FAQ page answering common product demo questions
- a replay email with timestamps to key moments
This matters because it helps your team get more value from the work you already did.
A Simple Framework You Can Reuse Every Time
When I want to keep things simple, I come back to this checklist:
- Choose the audience
- Name the real problem
- Define the one win
- Pick the one workflow that proves it
- Write a 30-second hook
- Plan one early, one middle, and one late interaction
- Decide on the proof moment
- Choose one primary CTA and one secondary CTA
- Rehearse the flow
- Repurpose the best parts afterward
That framework is practical, repeatable, and flexible enough to work across products and industries.
A Quick Example of What This Looks Like in Practice
Let’s say your webinar is for small B2B marketing teams that want a better way to run product demos through webinars.
Audience
Marketing managers
Problem
Weak follow-up after live webinars
Promised win
A repeatable demo funnel that keeps working after the event ends
Hook
“If your webinars attract sign-ups but fail to move people toward action, this session will show you how to build a product demo workflow that captures intent, improves follow-up, and turns one event into a repeatable funnel.”
Core workflow
- Create the webinar
- Customize the registration page
- Add a live poll
- Trigger replay follow-up
- Track CTA clicks
Interaction plan
- Early poll: What is your biggest webinar bottleneck?
- Mid-webinar chat prompt: What tool are you using right now?
- Late choice point: Do you want to go deeper into analytics or automation?
Proof moment
Show the automated replay email and the engagement report side by side
CTA
- Primary CTA: Start a free trial
- Secondary CTA: Download the launch checklist
That is a complete webinar product demo plan, and it is much easier to build when every part has a clear purpose.
Key Takeaway
The best interactive webinar product demos do not try to show everything. They show the right thing in the right order.
They start with:
- one audience
- one painful problem
- one promised win
Then they move through:
- a clear workflow
- useful interaction
- visible proof
- a natural next step
That is what makes a webinar product demo worth watching, easy to remember, and strong enough to convert.
How to Choose the Right Webinar Product Demo Format
The best webinar product demo format depends on your sales cycle, audience intent, and how much real-time interaction the session needs. Live, automated, hybrid, workshop-style, and on-demand demos each work best in different parts of the funnel.
If you pick the wrong format, even a great presenter will struggle. If you pick the right one, an average presenter can still win because the structure does the heavy lifting.
Live demo webinars are best when you need to handle objections in real time, especially around pricing, security, integrations, or “will this work for my workflow?”
Automated demo webinars work when your core workflow is stable and repeatable, and you want an always-on asset that qualifies leads.
Hybrid is my favorite for many teams because you can record the “tight demo portion” and then go live for intro, interaction, and Q&A.
Once you know whether your product demo webinar is live, automated, or hybrid, the right structure becomes much easier to build.
After you have that instinct, use the table below to map your funnel goal to the right style.
| Format | Best For | Audience Expectation | Interaction Level | Best CTA | Biggest Risk | Best Fix |
|---|---|---|---|---|---|---|
| Live Demo Webinar | Mid-to-late funnel decisions | “Answer my questions live” | High | Book a call or start a trial | Tangents derail flow | Use a Q&A pivot and timebox deep dives |
| Automated Demo Webinar | Scale and 24/7 qualification | “Let me watch when I want” | Medium (planned) | Start a trial or self-serve | Feels generic | Add segmentation polls and “choose your path” |
| Hybrid Demo Webinar | Trust plus polish | “Clean demo plus live answers” | High in Q&A | Call, trial, or workshop | Overproduced, less human | Go live for intro, polls, and Q&A |
| On-Demand Demo Webinar | Self-serve buyers | “Let me skim and replay” | Low to medium | Trial or checklist | Drop-off without guidance | Add chapters and a short orientation |
| Workshop-Style Demo Webinar | Activation and onboarding | “Help me do it” | High | Complete a setup step | Too complex live | Keep the workflow small and repeatable |
Once you pick the format, you can build the demo like a system instead of reinventing it every time.
Templates You Can Copy to Plan a Webinar Product Demo
Templates make webinar product demos easier to plan, repeat, and improve. A simple planning worksheet, storyboard, and CTA file can help teams stay focused, reduce feature dumping, and build demos faster across campaigns.
Templates are not filler. They reduce decision fatigue, improve consistency, and let you scale webinar product demos across campaigns and teams.
I recommend building three templates once, then reusing them for every webinar demo. When I do that, production speed goes up, and quality becomes easier to maintain.
Here are the templates that do the most work for you.
- Goal worksheet: keeps scope tight and messaging consistent
- Storyboard: prevents feature dumping and keeps the demo flowing
- CTA swipe file: helps you match the CTA to the intent level
Lock the Strategy With a Goal-Setting Worksheet Before You Build Anything
Copy this into a doc and fill it out before you touch slides.
- Primary persona
- Weekly pain point that actually hurts
- What they tried before
- The “win” by the end of the webinar
- Top objections you must address
- Three features you will show, maximum
- One primary CTA and one secondary CTA
Map the Demo With a Simple Storyboard, So It Feels Guided
A storyboard keeps the session from wandering. I storyboard the demo like I am guiding someone through a small transformation, not showing them a product museum.
Use this structure:
- Hook and promise
- Who it is for and who it is not for
- Workflow step 1, step 2, step 3
- Proof moment
- Common mistakes to avoid
- CTA and Q&A pivot topics
Build a CTA Swipe File So You Do Not Default to “Book a Demo”
In 2026, many buyers want to self-serve before they talk. If your only CTA is “book a demo,” you will lose people who actually liked the webinar but were not ready to commit time.
Here are CTA options you can rotate:
- “Start a free trial and recreate this workflow.”
- “Book a quick fit check and we’ll map this to your use case.”
- “Download the templates and build your version internally.”
- “Join the next live workshop to implement it with us.”
Templates help you plan, but interaction is what keeps your audience mentally present. Once you understand how to make interactivity feel useful instead of gimmicky, your retention and conversion usually rise together.
Interactive Elements To Make Webinar Product Demos Feel Personal & High-Trust
Interactivity is not about being flashy. It reduces uncertainty. When someone participates, even in small ways, they build ownership in the outcome and stay attentive longer.
In practice, the goal is to create an interactive product experience that helps prospects understand value through action, not explanation.
The biggest mistake I see is adding interaction as decoration. Polls and chat should shape what you do next. Q&A should be controlled so that it increases clarity rather than pulling you into tangents.
If you want a clean interaction stack, start with the basics and improve over time. Most teams do better by nailing a few interactive moments than by piling on every feature.
Here is the set that usually creates the biggest lift:
- Polls that segment by goal, role, or current tool
- Chat prompts that capture context and personalize examples
- Q&A pivots where attendees vote on the next topic
- Clickable resources such as checklists, templates, and setup guides
- Mobile-friendly screen sharing with zoomed views and narrated outcomes
Once interactivity is planned, the next layer is reliability. A strong demo can still lose trust if audio drops, screenshare lags, or the presenter has no fallback when something breaks.
Technical Setup for Webinar Product Demos
A shaky demo creates an unspoken question: “If the demo is messy, will the product be messy too?” Even if it is unfair, audiences interpret reliability as a proxy for product quality.
You do not need a studio. You need clarity, stability, and a backup plan. The minimum viable technical setup is clean audio, stable internet, readable screen share, and a fallback if something breaks.
After you have the basics, these are the pieces that cover most issues:
- 1080p webcam (or a modern laptop camera with good lighting)
- External microphone for a clear voice
- Stable upload connection (Ethernet if possible)
- One pre-recorded demo segment as backup
- A PDF walkthrough to share if screenshare fails
- A co-host who can take over if needed
Here’s a quick video that will help you choose the best webinar equipment for your product demos:
With a stable setup, you can finally measure what is working and what is not. Metrics turn your webinar product demo from a one-off event into an improving system.
Metrics to Track to Improve Performance Over Time
If you only measure “how many people attended,” you will not know what to fix. The metrics that matter connect attention to action.
I track the basics after every run, then I look for one improvement hypothesis. For example, if drop-off happens right before the CTA, the problem might be demo length or a weak proof moment. If engagement is low, you probably need better interaction timing, not more features.
A strong measurement set looks like this:
- Registration rate and attendance rate
- Average watch time and drop-off timestamps
- Engagement rate from polls, chat, and Q&A
- CTA click rate
- Demo-to-trial conversion and booked call rate
Metrics tell you what happened, but they do not automatically tell you why it happened. The next section translates common performance patterns into specific fixes you can apply immediately.
Common Webinar Product Demo Problems & How To Fix Them Fast
Most webinar product demo failures are not talent problems. They are architectural problems. The good news is that once you learn to spot the pattern, fixes are usually straightforward.
Diagnose Early Drop-Off by Fixing Your First Two Minutes
If people leave in the first five minutes, your hook is not doing its job. The audience is silently asking, “Is this for me?” If you do not answer that immediately, they will leave, even if the product is a perfect fit.
The fastest repair is to rewrite your opening as pain, promise, and proof you will show. Then remove anything that delays relevance, like long intros, company history, or feature lists.
Raise Low Engagement by Making Interaction Feel Useful, Not Forced
Low engagement happens when interaction feels like a performance. People respond when interaction helps them get a better answer.
A poll should shape what you show next. A chat prompt should capture role, goal, or constraints so you can adapt your example. When you treat interaction as personalization, participation rises.
Here are reliable engagement lifts:
- Place a poll early and reference the result out loud
- Use a mid-webinar chat prompt to personalize the next example
- Add a vote-based Q&A pivot so the audience chooses direction

Prevent Feature Overload by Building the Demo Around One Workflow Spine
Feature overload makes your demo feel long, even if it is not. The audience gets tired because they cannot connect screens to outcomes.
A clean webinar product demo usually has one workflow “spine” that proves the win. Everything else becomes an optional path you cover only if the audience asks or votes for it.
Reduce Q&A Chaos by Turning Questions Into a Controlled Branching Moment
Unstructured Q&A is where strong demos go to die. Someone asks a deep question, the presenter dives in, the rest disconnects, and the session never recovers.
A structured approach solves this: collect questions early, group them into themes, then let attendees vote on which theme you tackle first. If a question is important but too deep, park it with a clear webinar follow-up option.
Improve Weak Conversion by Aligning Your CTA With the Win You Just Proved
Weak conversion usually means the CTA does not match the story. If you just demonstrated “launch your first campaign in 10 minutes,” but your CTA is “book a demo,” you introduced unnecessary friction.
I like to make the CTA a continuation of the experience. The next step should feel like the obvious path to achieving the same win with their own context.
Conversion fixes that tend to work:
- Use one primary CTA, not multiple competing CTAs
- Offer a secondary CTA for “not ready yet” buyers
- Place CTA once before Q&A and once at the end
- Add a resource that makes action easier (template, checklist, replay)
Fix Mobile Confusion by Designing for “Thumb Viewing” and Narrated Outcomes
Mobile viewers drop off when the text is tiny or when your cursor moves too fast. Even if someone likes the product, they will not fight your UI on a phone.
If you want mobile to work, design as it matters:
- Zoom into the exact area you want them to notice
- Slow down your clicks and narrate outcomes
- Avoid dense dashboards unless you simplify the view
- Use large-font slides for key steps and proof moments
Once you can diagnose and fix these issues, tooling becomes much easier to choose because you know what the demo actually needs. The next section gives you a practical comparison so you can pick platforms based on fit, not hype.
Webinar Product Demo Tools & Examples To Consider
Tools matter, but I always remind teams that tools only amplify what you already designed. If the webinar structure is messy, the platform will not save it. If the storyline is tight, even a simple setup can convert.
When I shortlist tools, I look for clarity on three things: how fast my team can produce, how interactive the session can be, and how measurable the outcome is.
If you’re looking for interactive product demo examples, the tools below are a solid starting point because they support both webinar-led demos and self-serve walkthroughs.
| Tool | Best For | Demo Format | Standout Capabilities | Pricing | When I Would Pick It |
|---|---|---|---|---|---|
| WebinarNinja | Webinar-led demos that need an all-in-one workflow | Live, automated, hybrid, series, on-demand | Built-in registration pages, email reminders, replays, polls, chat, Q&A, landing pages, and webinar hosting in one platform | A FREE 14-day trial is available. Paid starts at $0.30/attendee/month (includes CourseNinja worth $1200). | When I want to run demo webinars consistently without stitching together multiple tools |
| Demio | Clean, browser-based demo webinars with strong engagement features | Live and automated | No-download browser access, polls, featured actions, handouts, real-time engagement tracking | Paid plans based on room size and automation features | When simplicity and low friction for attendees matter most |
| Livestorm | Data-driven demo webinars for B2B teams | Live, automated, and on-demand | Strong analytics dashboard, CRM integrations, audience segmentation, browser-based delivery | Paid plans scale by attendee volume | When I care deeply about engagement data and CRM syncing |
| Walnut | Personalized demo experiences tailored by persona or industry | Best paired with live or hybrid webinars | Dynamic demo flows, persona-based paths, sandbox environments, data personalization | Custom pricing | When personalization is the core selling advantage and I have clear persona segments |
| Storylane | No-code interactive demos for follow-up and self-serve exploration | Best paired with webinar replays and landing pages | Clickable walkthroughs, hotspots, fast publishing, embeddable demo flows | Freemium plus paid tiers | When I need quick self-serve demos that extend the webinar experience |
| Navattic | High-polish interactive SaaS demos | Best for on-demand and post-webinar follow-up | Fully customizable demo flows, analytics tracking, gated demo access | Custom pricing | When the sales cycle requires structured product exploration before a call |
| Consensus | Scaling demo content across buying committees | Live webinar plus on-demand demo clips | Personalized demo videos, buyer tracking, stakeholder sharing tools | Custom pricing | When multiple decision-makers need tailored demo views without booking separate calls |
If you want a practical way to use this, start by choosing the platform that best supports webinar delivery and interaction. Then decide if you need a dedicated interactive demo tool to extend the experience beyond the webinar.
Here is the selection filter I use:
- If your demo must be live, interactive, and measurable, pick the webinar platform first
- If your demo must be personalized or self-serve at scale, add a demo experience layer
- If your sales team needs repeatable rep-led execution, enablement tools may matter more
When to Use a Webinar Product Demo & Who Benefits Most
Webinar product demos are most useful when you want to scale a high-trust explanation without losing human presence. They work especially well mid-funnel, when prospects are curious but not ready for a sales call, and when you want a repeatable asset that keeps qualifying leads.
I have also seen them work extremely well for customer onboarding and feature adoption. A workshop-style webinar demo can reduce support load, accelerate time-to-value, and improve retention because customers experience a win quickly.
Common use cases where webinar product demos perform well:
- Driving sales conversions with one-to-many persuasion
- Onboarding new users with guided setup workflows
- Launching new features with clear “how to” guidance
- Training partners and resellers on positioning and usage
- Reducing support tickets by showing repeatable fixes
Also, here is another quick video to help you understand the benefits of webinars for coaches, trainers and educators:
At this stage, you have the definition, the format, the build process, and the optimization levers. Now it is time to bring it together into a simple philosophy you can use to keep demos persuasive without making them feel pushy.
Create a Webinar Product Demo That Converts
If you want your webinar product demo to perform in 2026, stop trying to impress people with everything your product can do. Impress them with clarity.
Talk about one painful problem, show one clean workflow, prove one meaningful result, then offer one next step that matches the audience’s intent. That’s the conversion recipe I come back to, even after years of building demos. When I need the simplest path to delivering webinar-led demos with built-in interaction and follow-up, I prefer an all-in-one webinar platform.
Tools like WebinarNinja can make it easier to run live, automated, and hybrid demo webinars from one place, especially when you want registration, reminders, chat, polls, Q&A, and replay delivery without stitching together multiple tools.
Frequently Asked Questions

How Do You Create a Webinar Product Demo Script That Does Not Sound Salesy?
Write your script like a guided problem-solving session: name the pain, show the workflow, then reveal the result. Skip feature lists and vague adjectives. A practical rule is to narrate every step in terms of change: what improves, what disappears, or what becomes easier to measure. This keeps the tone helpful, not promotional.
What Should a Demo Environment Include So It Feels Real but Stays Safe?
Use realistic sample data, a clean account, and settings that match your target persona’s world. Avoid showing confidential integrations, real customer records, or anything you cannot safely share on a replay. Keep a resettable “golden demo workspace” you can restore quickly if something breaks or gets changed during questions.
How Do I Repurpose a Webinar Product Demo Into Multiple Assets Without Re-Recording?
Treat the 7 to 12-minute demo segment as your reusable core. Clip it into short use-case videos, add chapters for an on-demand version, and turn the transcript into a blog post. Pull recurring questions from chat and Q&A and convert them into a short email sequence and a help-center article series to extend ROI.
How Do You Show Pricing in a Webinar Product Demo Without Losing Momentum?
Show pricing after the proof moment and before Q&A, and anchor it to outcomes instead of plan grids. Explain who each tier is for, what it replaces, and how to decide quickly. Offer two paths: a fast self-serve next step for ready buyers and a short fit check option for edge cases that need a human answer.
How Can You Prove ROI When Prospects Do Not Have Their Own Data Ready?
Focus on the mechanism of ROI rather than a single number. Show what manual work disappears, what becomes automated, and what becomes measurable, then give a range-based example tied to a familiar workflow. Offer a simple ROI worksheet that estimates time saved, errors reduced, and faster cycle time, since most teams can approximate those easily.
What Follow-Up Should I Send After a Webinar Product Demo to Increase Conversions?
Send the webinar replay quickly, plus one “action asset” like a checklist, storyboard, or setup guide. Then segment by behavior: CTA-clickers get implementation help, watchers get a mini case example, and no-shows get the short demo segment link. Include one timestamped highlight so people can jump straight to the most persuasive moment.
How Do I Prevent Q&A From Hijacking the Webinar Product Demo?
Collect questions early, group them into themes, and run a quick vote on what to cover first. Timebox each theme so you stay on track while still answering what matters. Keep a “parking lot” slide for deep dives and offer office hours or a follow-up resource for advanced topics, so the webinar remains tight and useful for everyone.
Want to host a webinar for free?
Use WebinarNinja to teach, improve marketing, and grow your sales.