That was utterly embarrassing. 😅
A colleague hosted a webinar yesterday and forgot to check the comment box. Turns out, attendees were far more captivated by the 🕷️ spiders crawling on her background wall than the actual content of her session. Yikes! 😬
As someone who’s been in the video, digital events, and webinar space for over a decade, I can tell you that a virtual background is your best friend. It’s professional, cost-effective, and keeps your audience focused. 🧑💻
But how do you pick the perfect webinar virtual background? And why does it matter so much? 🤔
This guide will walk you through everything you need to know about effectively choosing and using virtual backgrounds. 🖼️
Let’s dive in. 🚀
What is a Webinar Virtual Background?
A webinar virtual background is like a digital stage curtain for your video calls. Instead of showing your real-life backdrop, it replaces it with an image or video of your choice.
Think tropical beaches, sleek office spaces, or even your company logo—it’s your way of setting the mood or hiding distractions.
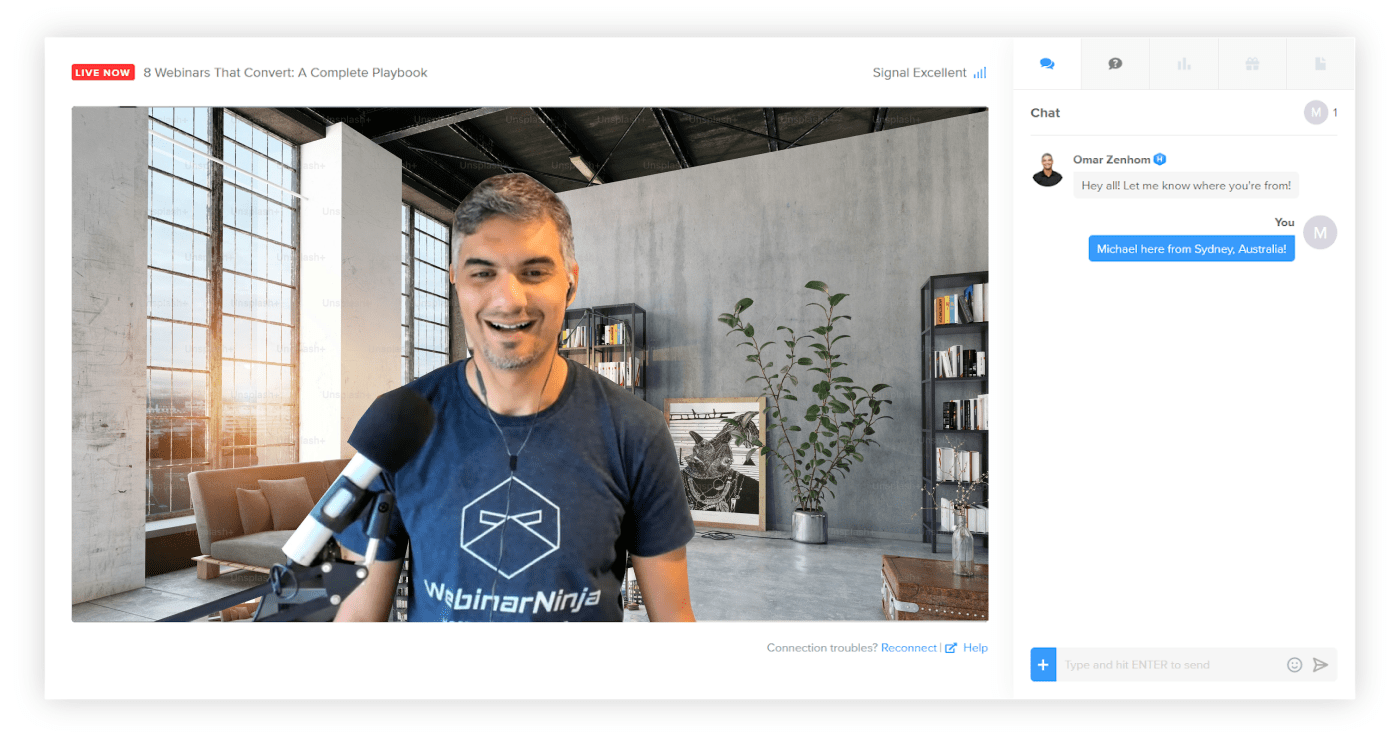
Most platforms let you upload a webinar background and apply it with a click. It’s great for looking professional or just having fun (because who doesn’t want to attend a meeting from outer space?).
How to Create Webinar Virtual Background
While you use a good webinar platform like WebinarNinja to create and host a webinar, you can easily create webinar backgrounds in just a few steps.
Here is what you need to do:
1. Access the Webinar Studio:
- After creating and publishing your live webinar, locate it on your dashboard.
- Click “Enter Studio” to open the studio setup.

2. Add a Virtual Background:
In the studio, navigate to the “Background” tab.
You have two options:
- Virtual Background: Choose from preset backgrounds to instantly change your backdrop.
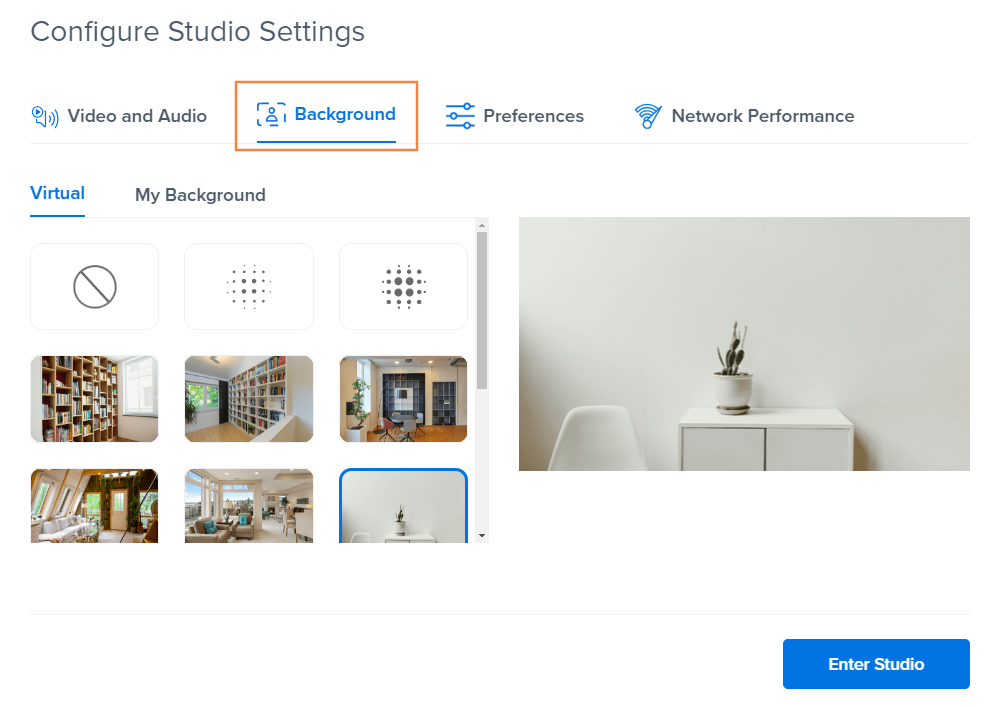
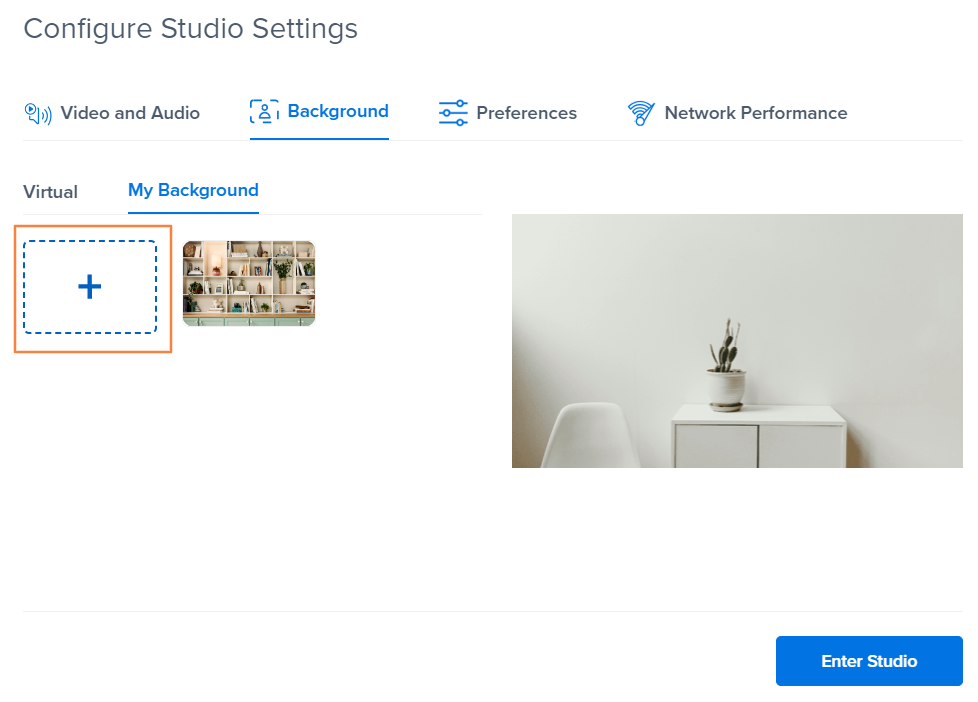
- My Background: To use a custom background, switch to this tab, upload your desired image, and click “Enter Studio.”
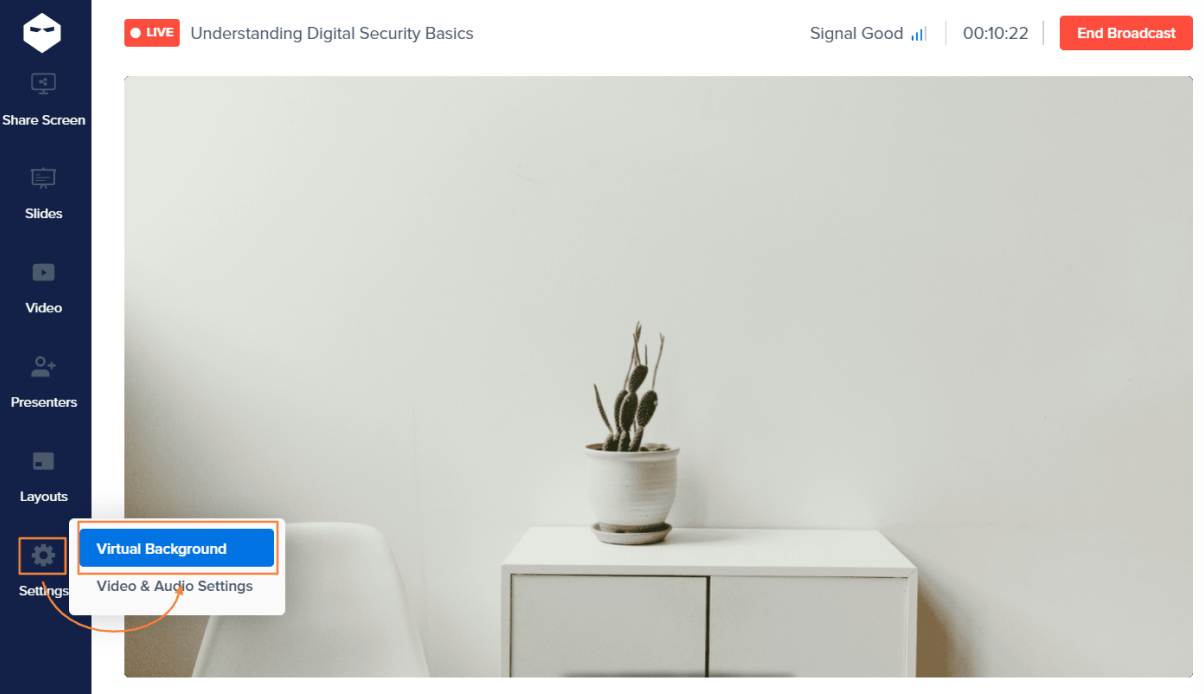
3. Change the Background During a Live Webinar:
Even during your live session, you can adjust the background without interruption:
- Navigate to “Settings” in the side panel.
- Select “Virtual Background” to choose a different background as needed.
That’s it!
That’s all you need to do while you wish to add a virtual webinar background, initially or during the live session.
Bonus: Here are a few interesting virtual webinar background images that you can download and use in your next session.


Why Use a Virtual Background for Webinars?
Virtual backgrounds are a simple yet powerful way to elevate your webinars. Whether you’re aiming for professionalism, engagement, or just a touch of fun, they have you covered.
Here are some reasons why you should consider using virtual background for webinars:
1. Transform Your Space into a Professional Setting Instantly
Not everyone has the luxury of a picture-perfect home office, but that doesn’t mean your audience needs to see your laundry pile or kitchen sink. A virtual background in webinars can instantly give you a polished and professional on-camera presence, ensuring you’re always ready—no last-minute tidying required.
2. Keep the Focus on You and Your Content
Distractions in the background can steal attention faster than you can say, “Let’s dive in.” A virtual background ensures that your audience stays glued to what you’re saying rather than what’s happening behind you. No more side-eye at your cat making a cameo or a nosy glance at your bookshelf.
3. Show Off Your Brand or Personality
Virtual backgrounds aren’t just for hiding clutter—they’re also a golden opportunity to make your webinar pop! Add your company logo, stick to brand colors, or pick a creative theme that reflects your personality. It’s a simple way to make your session more memorable.
4. Adapt to the Tone and Purpose of Your Webinar
Whether you’re hosting a formal business presentation or a lighthearted team quiz night, virtual backgrounds let you set the vibe. From sleek corporate backdrops to fun, themed settings, you can tailor your “space” to match the energy of your event.
5. Minimize Technical Hassles with an All-Terrain Solution
Forget about scouting the perfect location or worrying about lighting. A virtual background works its magic regardless of where you are. Dim lighting? No problem. A busy café? Bring it on. All you need is a decent webcam, and voila—your backdrop looks impeccable.
6. Boost Engagement and Build Connection
A well-chosen background can do more than just look good—it can spark conversations, set the tone, or even break the ice. People love a touch of creativity or humor, and your background could be the perfect way to start things on the right note.
7. Ensure Privacy, No Matter Where You Are
Hosting a webinar from home, a coworking space, or a hotel room? A virtual background protects your personal space from prying eyes. You can share your knowledge without worrying about sharing too much of your life.
8. Add a Dash of Fun and Creativity
Who says professional webinars have to be boring? A quirky background can make your session stand out and give attendees something to smile about. Whether it’s a beach setting, a sci-fi spaceship, or a custom design, it’s a chance to show off your fun side.
How to Choose the Right Virtual Background for Your Webinar
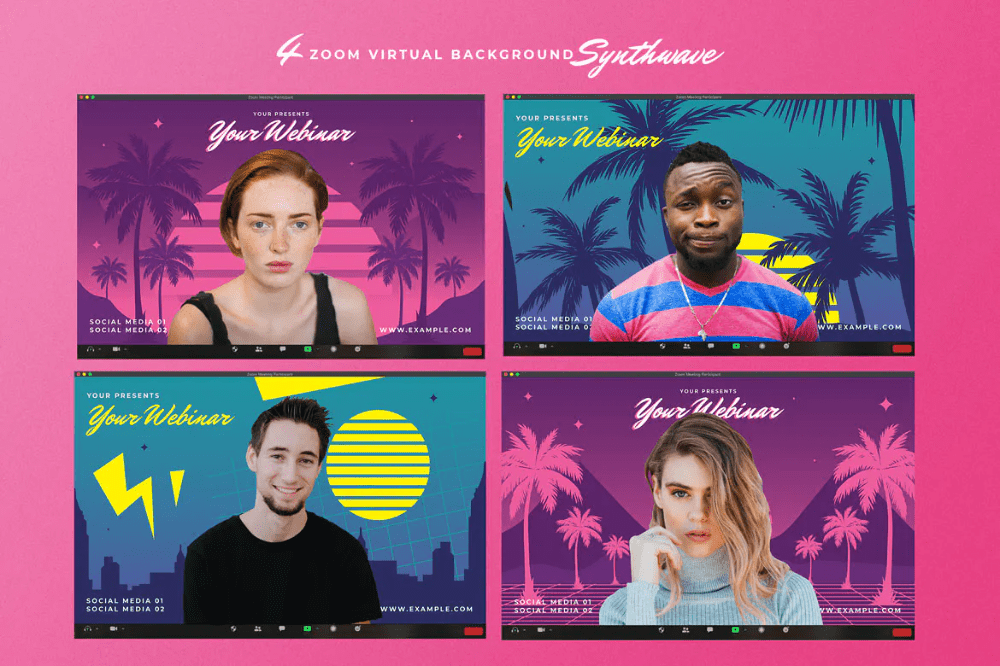
(Image Source: Pinterest)
A well-thought-out virtual background can help you make a professional impression during a webinar.
Below are steps to choose the perfect virtual background for your webinars:
1. Define Your Webinar’s Purpose to Set the Right Tone
Your virtual background should align with the overall purpose of the webinar. Consider whether the session is formal, casual, or creative.
Besides, think about the audience’s expectations and preferences. A mismatched background can detract from your message and leave a poor impression.
Examples:
- Corporate Training: A neutral office setting or clean gradient background to exude professionalism.
- Creative Workshop: A vibrant, artistic background, such as abstract art or a studio setup, to inspire creativity.
2. Align the Background with Your Branding for Consistency
A background that reflects your brand identity reinforces your professionalism and helps create a cohesive visual experience. Incorporate your brand colors, logo design, or other visual elements if possible.
Make sure the design isn’t overly complicated and leaves room for any overlays or text that may appear during the webinar.
Examples:
- Tech Startup Demo: A futuristic virtual background with subtle gradients in your brand colors.
- Nonprofit Webinar: A backdrop of your organization’s key projects or community work to reinforce your mission.
3. Choose a Background That Keeps the Focus on You and Your Content
Your background should be enhanced, not detracted from, the webinar’s content. Avoid cluttered or overly detailed designs that can distract viewers. If you plan to include text overlays or slides, ensure the background provides enough contrast for readability.

Examples:
- Educational Webinar: A plain white or lightly textured wall with no visual clutter.
- Marketing Presentation: A simple office setting with blurred shelves to subtly suggest professionalism without distractions.
4. Optimize Your Background for Lighting and Video Quality
Lighting plays a crucial role in how your virtual background appears. A poorly lit setup can cause distortion, while extreme brightness can make the background overpowering.
Test how the lighting in your room interacts with your background to ensure clarity and avoid pixelation.
Examples:
- Bright Space: Use a clean, bright background to complement natural light.
- Dim Environment: Opt for darker shades with soft textures to avoid overexposure.
5. Match Your Outfit to the Background for a Polished Look
Your outfit should complement the background rather than clash with it. Avoid colors or patterns that might blend into the virtual background. This ensures that you remain the focal point of the webinar.

Examples:
- Formal Webinar: Avoid wearing green if using a virtual greenscreen background to prevent blending issues.
- Casual Discussion: Match a soft blue background with a white or pastel outfit for a clean look.
6. Consider Your Equipment’s Capabilities to Avoid Technical Issues
Ensure your device effectively supports virtual backgrounds. Low-resolution cameras may struggle with complex designs, causing glitches or lag. A simple background can minimize technical hiccups.
Examples:
- High-Resolution Webcam: Use detailed virtual backgrounds like a modern co-working space.
- Standard Webcam: Stick to minimalistic designs that won’t pixelate or lag.
7. Test the Background in Advance to Ensure It Works Seamlessly
Conduct a test run to see how the background appears during the webinar. This helps you identify and address any issues, such as awkward positioning, lighting problems, or mismatched colors.
Examples:
- Dry Run: Conduct a mock webinar with your background to ensure it complements your slides.
- Adjustments: Modify the brightness or remove unnecessary elements if they appear distracting.
Best Practices for Using Virtual Backgrounds in Webinars
Wish to create a better impression with virtual backgrounds?
Here are some tips, tricks, and best practices to get the best results:
1. Enhance Depth with Lighting Techniques for a Professional Look
- Double Lighting for Depth: Use two light sources on either side of your face and one behind you to create a three-dimensional look. This helps reduce the flat, unnatural appearance virtual backgrounds often produce.
- Colored Accent Lighting: Place a subtle colored light (e.g., blue or orange) behind you for added contrast that integrates seamlessly with your virtual background.
2. Make Backgrounds Dynamic and Engaging to Capture Attention
- Animated Subtle Loops: Use a looping video as a virtual background, but keep it subtle (e.g., gently moving clouds or waves). This gives a premium feel without distracting the audience.
- Interactive Elements: Include a background that reacts to your gestures (e.g., software like mmhmm or OBS). For instance, a spotlight effect can follow your movements.
3. Showcase Branding Without Overdoing It to Maintain Professionalism
- Personalized Touch: Create a custom background with your name, title, and brand logo, but keep it minimal. Add a semi-transparent gradient to make the text legible without dominating the frame.
- QR Code Integration: Add a small, unobtrusive QR code linking to your website, portfolio, or social media on one corner of the virtual background.
4. Coordinate Your Looks for a Polished and Harmonized Appearance
- Color Harmony: Match or complement your outfit with the dominant colors in your background. This creates a polished, intentional look. Avoid using similar tones to the background to prevent blending in.
- Texture-Friendly Fabrics: Stick to solid colors with a matte finish to avoid visual artifacts from reflective materials.

5. Increase Realism with Subtle Details to Avoid a Fake Appearance
- Parallax Effect: Use tools that simulate slight depth shifts as you move. This mimics a real background’s parallax and increases believability.
- Blur Edge Masking: Use software that slightly blurs the edges of your silhouette to reduce harsh outlines common in virtual backgrounds.
6. Align Perspective for a Natural Feel and Seamless Integration
- Perspective Matching: Align the camera angle and your eye line to match the perspective of the virtual background. This makes the background appear more natural and immersive.
- Shadow Layering: Add a faint shadow under your virtual chair or desk area to enhance realism.
7. Refine Your Setup for Professionalism and Seamless Execution
- Pre-Test the Environment: Move around during a test session to check how the virtual background reacts to gestures and head movements. Adjust lighting and settings as necessary.
- Background Frame Guides: Add invisible guide grids to your background during design to ensure your position doesn’t block important elements like text or logos.
8. Adapt Backgrounds to Your Topic for Contextual Relevance
- Context-Specific Backgrounds: Change backgrounds based on the topic of your presentation (e.g., a library for education webinars or a studio setup for creative discussions).
- Easter Eggs: Hide subtle, relevant Easter eggs in your background for observant viewers (e.g., a book title, a date, or a slogan).
9. Optimize with High-Quality Tools and Settings for Crisp Visuals
- High-Resolution Images: Always use 1920×1080 or higher resolution backgrounds to avoid pixelation.
- Chromakey Overlays: If you use a green screen, fine-tune the chromakey settings to reduce color spill, which improves separation from the background.
10. Leverage Software to Boost Visual Appeal and Realism
- AI Background Optimization: Use AI-powered software (like NVIDIA Broadcast) that dynamically adjusts your background based on lighting and movement.
- Virtual Depth of Field: Enable slight blur effects in tools like Zoom or OBS to simulate a professional DSLR camera look.
Elevate Your Webinar Experience with Virtual Backgrounds
Virtual backgrounds can transform your webinar experience, adding a layer of professionalism and creativity without the hassle of setting up a picture-perfect environment. They keep the focus on your content while providing a visually engaging backdrop.
You can use a good webinar platform, like WebinarNinja, which takes this further with its smart virtual background feature. You can easily upload your own images or choose from preloaded options to match your event’s theme or branding.
So, creating immersive, visually striking webinars becomes effortless, and your audience remembers your message, not your messy room!
Want to host a webinar for free?
Use WebinarNinja to teach, improve marketing, and grow your sales.


