Over the years, I’ve hosted hundreds of webinars. And guess what — some of them have been more successful than others.
But CONSISTENCY has never been an issue for me. Why?
That’s because I’ve mastered a baseline of quality from doing so many reps. The secret? My webinar checklist.
Hosting webinars is not equal to creating Meet or Skype links. So, before you click on that ‘Enter Studio’ button, ensure you’re confident not just of your script but of everything else concerned.
Don’t worry. It’s not that complicated. In fact, I’ll make it super easy for you in this blog. Time to sit back and read so that when you host an event, you take every step with confidence.
If you are just starting out with webinars, here’s a quick overview video that will put you on the path to success and walk you through the core steps to host a webinar.
The Ultimate Webinar Checklist: How to Prepare for a Successful Webinar
Your webinar planning should begin at least 8 weeks before the big day. In this section, I’ll share an in-depth, step-by-step guide to help you prepare for your event without the last-minute rush. Let’s start with the basics first –
Rule #1: Define Clear Webinar Objectives
Start by pinpointing the core purpose and goals of your webinar. That’s the starting point of successful webinar planning.
Understand why you want to host a webinar and what you hope to achieve. Whether it’s generating leads, launching a new product, or providing educational content, having a clear objective will guide your planning and execution.
Think about it this way: no road will get you there if you don’t know where you’re going. So, set specific, measurable, attainable, relevant, and time-bound (SMART) goals.
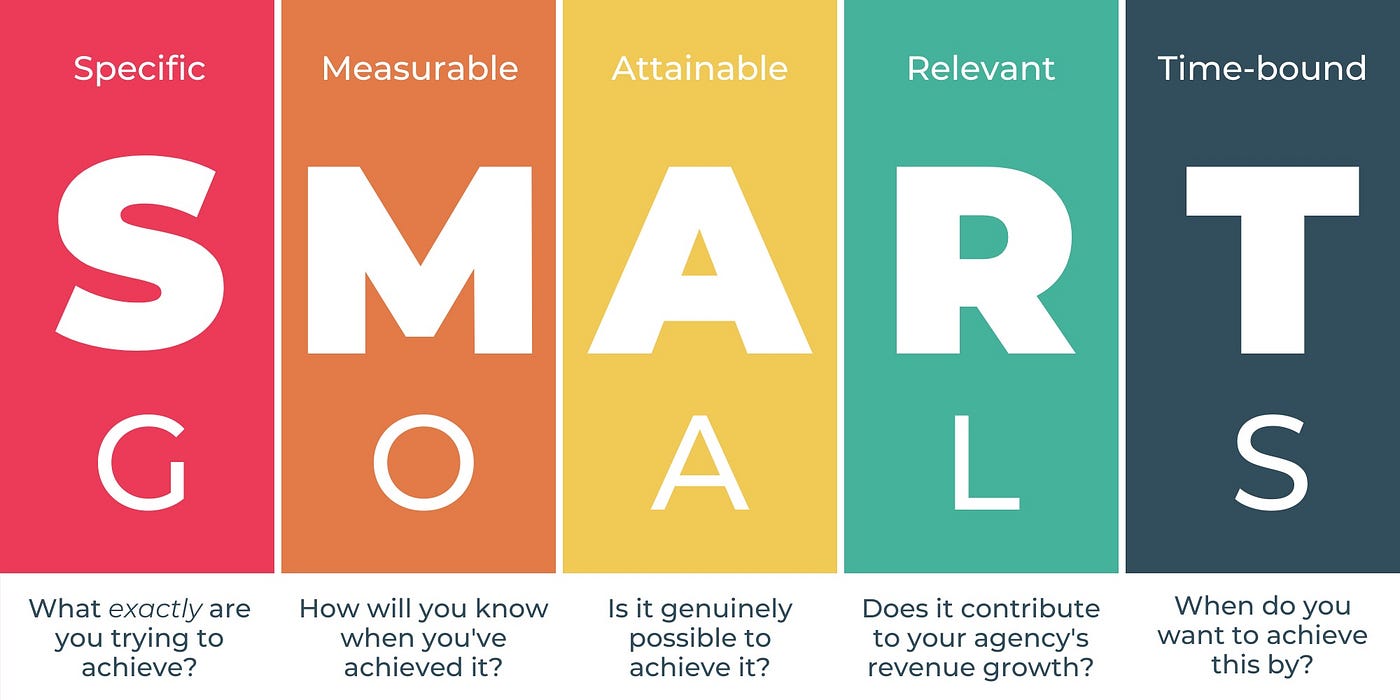
For instance, if your primary goal is lead generation, you might aim to collect 200 qualified leads. If your focus is brand awareness, you might look to achieve 1,000 live attendees or a certain amount of social media engagement.
Rule #2: Establish Measurable KPIs
Set specific, quantifiable key performance indicators (KPIs) to gauge your webinar’s success.
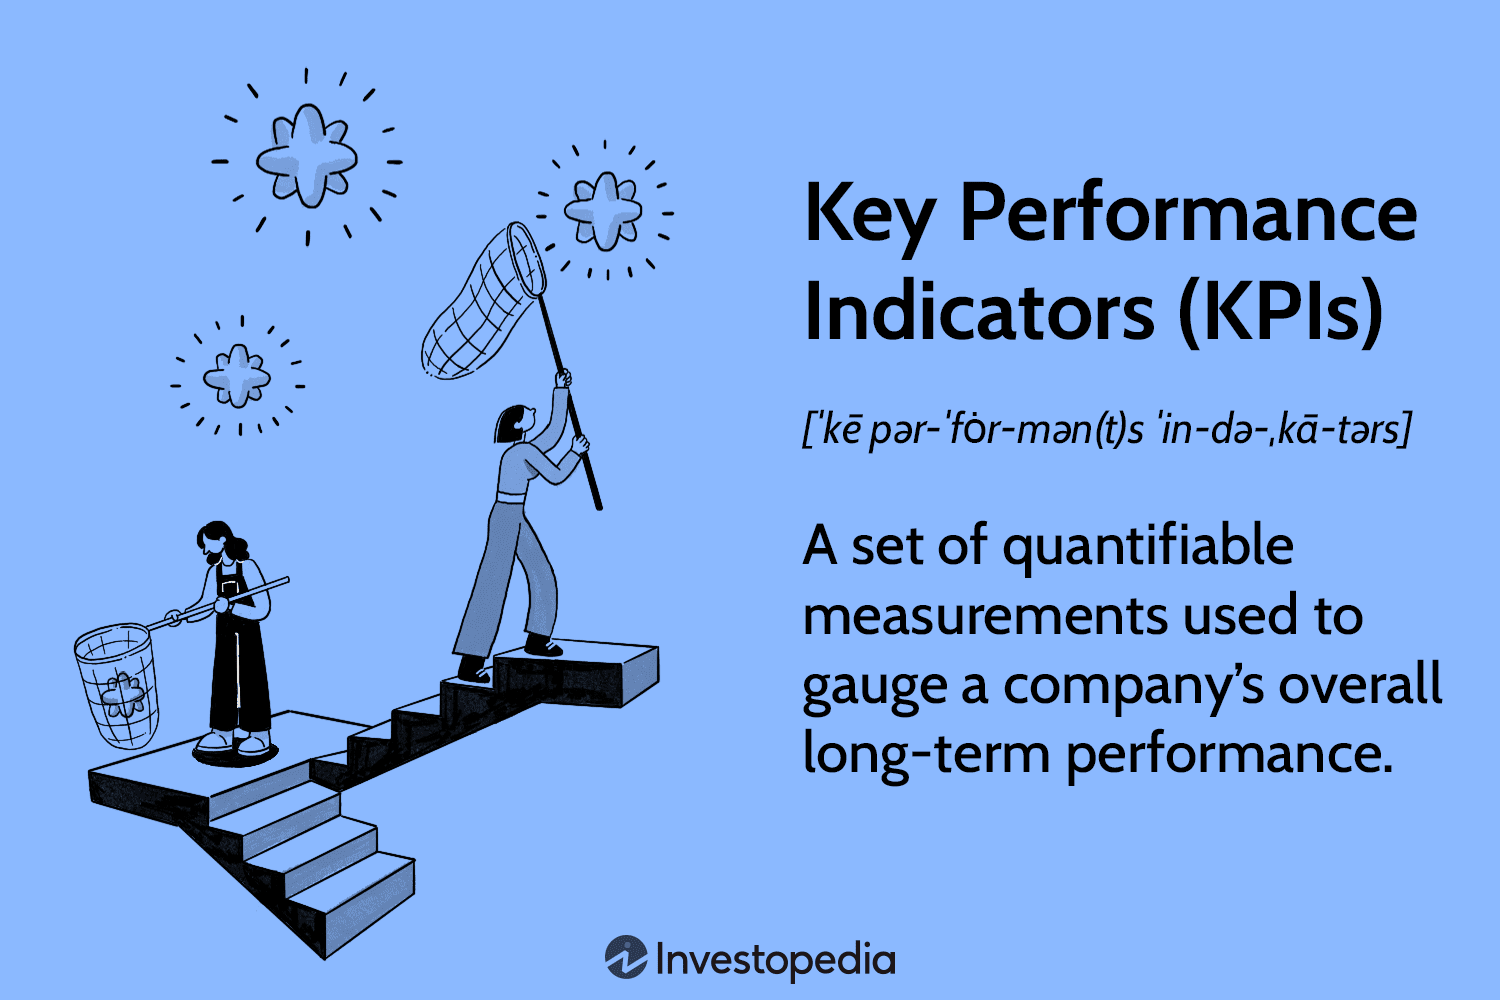
These metrics might include the number of registrations, attendance rates, drop-offs, and contributions to the sales pipeline. By defining these metrics, you create a structure for assessing the event’s impact and identifying areas for improvement.
So that’s it for the basics. Once you know your goals and objectives, creating and adhering to a webinar launch checklist becomes much easier. Let’s now proceed to the exhaustive pre-webinar checklist in the next section below.
Pre-Webinar Checklist: How to Plan the Journey Before the Webinar (From 8 Weeks to 2 Weeks)
Most successful live webinars are planned 8 weeks in advance. Keeping that as a point of reference, let’s get your planning started as well.
8 Weeks Before Your Webinar
The Planning Phase
Alright, enough discussions – it’s go time. About two months out is the perfect time to lay the groundwork for your webinar. Here’s what you need to do –
Step #1: Choose a Relevant Topic
Your topic is the hook that will attract attendees, so it needs to be both relevant and valuable to your audience.
Conduct research to find out what questions your audience is asking and what challenges they face. This will help you position your webinar as a must-attend event.
Next, I think it’s important to use keyword research tools. Even if your topic offers a unique perspective, it must express the same to the target audience. Here’s how to craft a compelling topic –
- Relevance: Ensure the topic addresses the current needs and interests of your audience. Use tools like Google Trends or social media listening to gauge what’s trending.
- Uniqueness: What unique perspective or solution can you offer? Stand out by providing insights or information that’s not readily available elsewhere.
- Clarity: Make your topic clear and specific. Avoid vague titles and go for something that clearly communicates the value of attending.
For instance, instead of “Digital Marketing Strategies,” try “5 Proven Digital Marketing Strategies to Double Your Leads in 20XY.”
Step #2: Finalize the Webinar Format
Choosing the right format for your webinar is crucial to ensuring it resonates with your audience and meets objectives. Here are some popular formats to consider –
- Presentation: A traditional format where a single presenter or a panel delivers content through slides and visuals.
- Panel Discussion: Multiple experts discuss a topic, providing diverse viewpoints and insights. This format is great for in-depth exploration of complex issues.
- Q&A Session: The focus is on answering questions from the audience. This format encourages interaction and directly addresses attendees’ concerns.
- Interview: A host interviews an industry expert or thought leader, providing valuable insights and engaging content.
- Workshop: A more interactive format where attendees participate in activities or exercises, ideal for hands-on learning and skill development.
- Product Demo: This format showcases a product or service in action, highlighting its features and benefits. It is effective for converting leads into customers.
Next, you need to decide on the right webinar platform for your event. Let’s discuss that in the next point.
Step #3: Select the Right Webinar Platform
Selecting a platform that suits your needs is pivotal in creating a successful webinar checklist. Look for features like ease of use, interactive tools (like polls and Q&A), and reliable technical support. Also, ensure that the platform you choose offers different webinar types, such as –
- Live Webinars:
These are great for real-time interaction and engagement. You can use live webinars for Q&A sessions and live demonstrations.
For beginners, live webinars offer a real-time, interactive experience where presenters share their expertise, answer questions, and engage with the audience directly. Features like chat, Q&A sessions, and polls create an immersive environment, allowing attendees to connect with each other and the presenter.
Watch this short video to learn how to host one –
- Automated Webinars:
Want to target a global audience in different time zones? Pre-recorded or automated webinars are a great way to ensure everyone can watch them at their convenience.
These webinars allow you to pre-record content, such as slides, videos, and demonstrations, and schedule it to play at specific times or on demand. The audience can still interact through features like chat and Q&A, maintaining the feel of a live event.
Looking to learn more about using automated webinars for growing your leads and sales?
- Hybrid Webinars:
Combine the best of both worlds. With hybrid webinars, you can present pre-recorded content with live Q&A sessions to engage attendees while ensuring high-quality content delivery.
What I like the most about this format is that it blends the energy of a live event with the polished quality of pre-produced segments, creating a seamless and engaging presentation.
- Webinar Series:
A series webinar is a sequence of sessions aimed at delivering a cohesive and in-depth learning experience. Usually, these start around a common theme and, with time, spread out over multiple sessions.
This format fosters participant engagement and builds a sustained learning journey, making it ideal for comprehensive training, workshops, or educational content that requires extended focus and attention.
WebinarNinja is one of those software platforms that tick all the boxes when it comes to different webinar types. You can customize webinars, set polls and other interactive elements, and captivate your target audience.
Also Read: 11 Features Every Webinar Software Must Have
Step #4: Schedule Your Webinar
Research the best times for your target audience. Avoid holidays and consider time zones if your audience is global.
Analyze your audience’s behavior—when will they most likely be available and attentive? Tools like Google Analytics can provide insights into peak engagement times.
For a global audience, consider hosting at a time that accommodates multiple time zones. For instance, a late morning slot in the US can capture both European and North American participants.
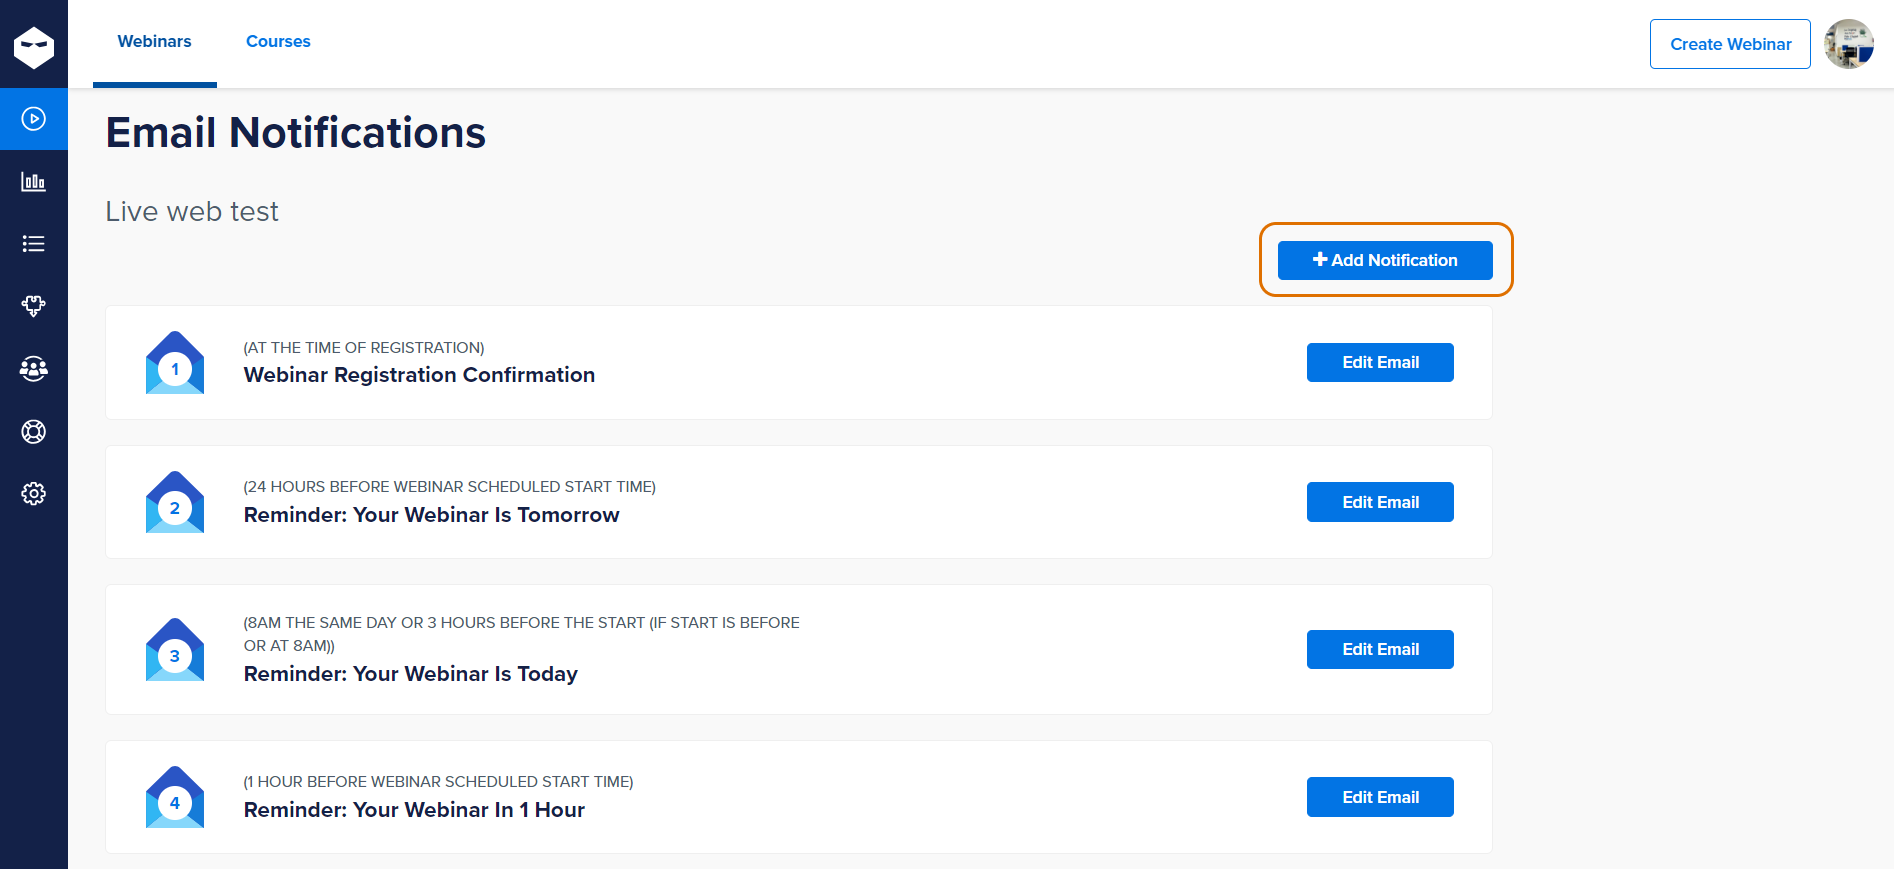
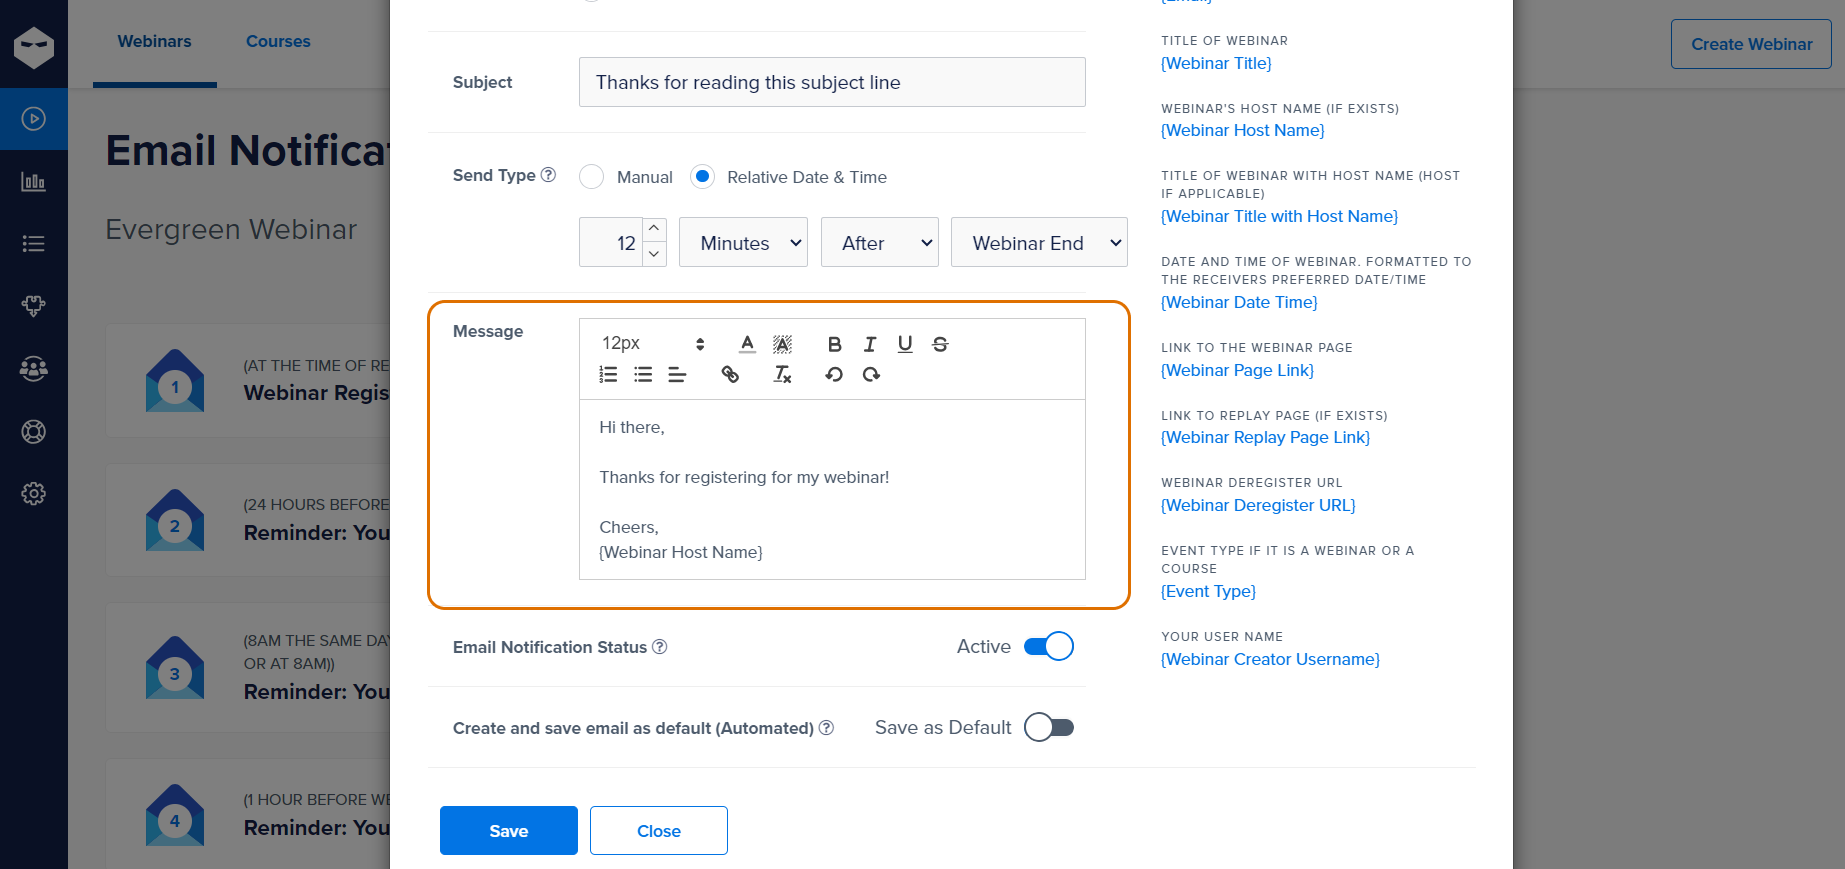
Once you’ve decided, send out a save-the-date notification to your audience. This early heads-up can help them reserve time in their schedules. In WebinarNinja, you can do this by turning on custom email notifications.
Step #5: Assemble Your Team
Let’s get straight to the point: You cannot handle a webinar alone, which means you need a team to work with. Here’s the bare minimum of people whom you may need –
- Project Manager: Ideally, you can take this role to oversee the entire process and keep everything on track.
- Marketing Specialist: This person handles promotions, email campaigns, and social media.
- Technical Support: Tech support professionals manage the technical aspects, including the webinar platform and troubleshooting. The webinar software vendor can help with this.
- Moderator: This person will assist during the webinar with managing Q&A, polls, and audience engagement.
With a team in place, you feel less burdened, and the event is more likely to be successful.
5 Weeks Before Your Webinar
The Fine-Tuning Phase
Five weeks out, you’ve solidified your goals, identified your ideal attendee, and crafted a captivating topic. Now, it’s time to fine-tune the machine and ensure a seamless webinar experience. Buckle up for the second phase of the webinar planning checklist.
Step #1: Develop a Marketing Plan
Your marketing plan should detail how you’ll promote your webinar. This includes email campaigns, social media posts, blog articles, and partnerships with influencers or other businesses.
I’ll simplify the whole thing in a few points –
- Start by identifying the key channels where your target audience is most active. This could be LinkedIn, Facebook, Twitter, or industry-specific forums.
- Develop a content calendar that outlines promotional activities over the coming weeks. This calendar should include the topics, formats (e.g., blog posts, videos, infographics), and the posting schedule.
- Tailor your messaging to each platform, ensuring that it speaks directly to the pain points and interests of your audience.
- Collaborate with influencers and partners who can help amplify your reach. These could be industry experts, bloggers, or complementary businesses.
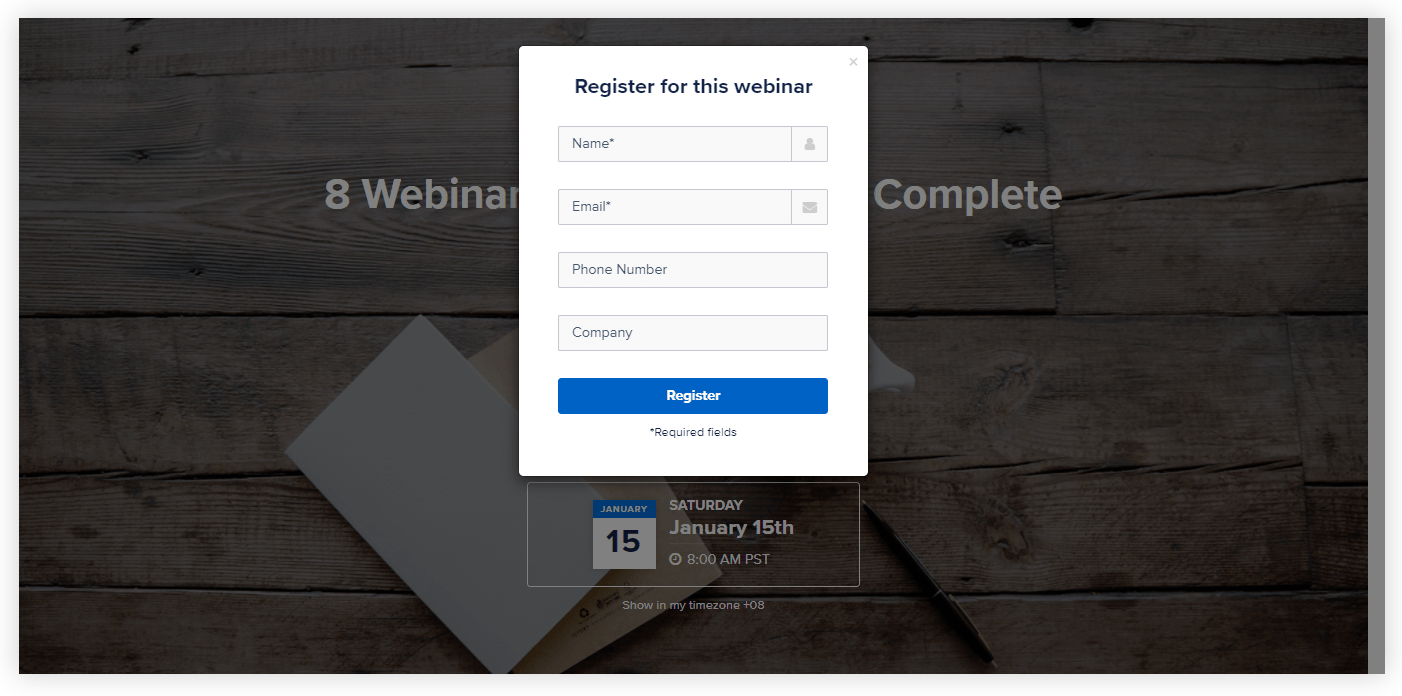
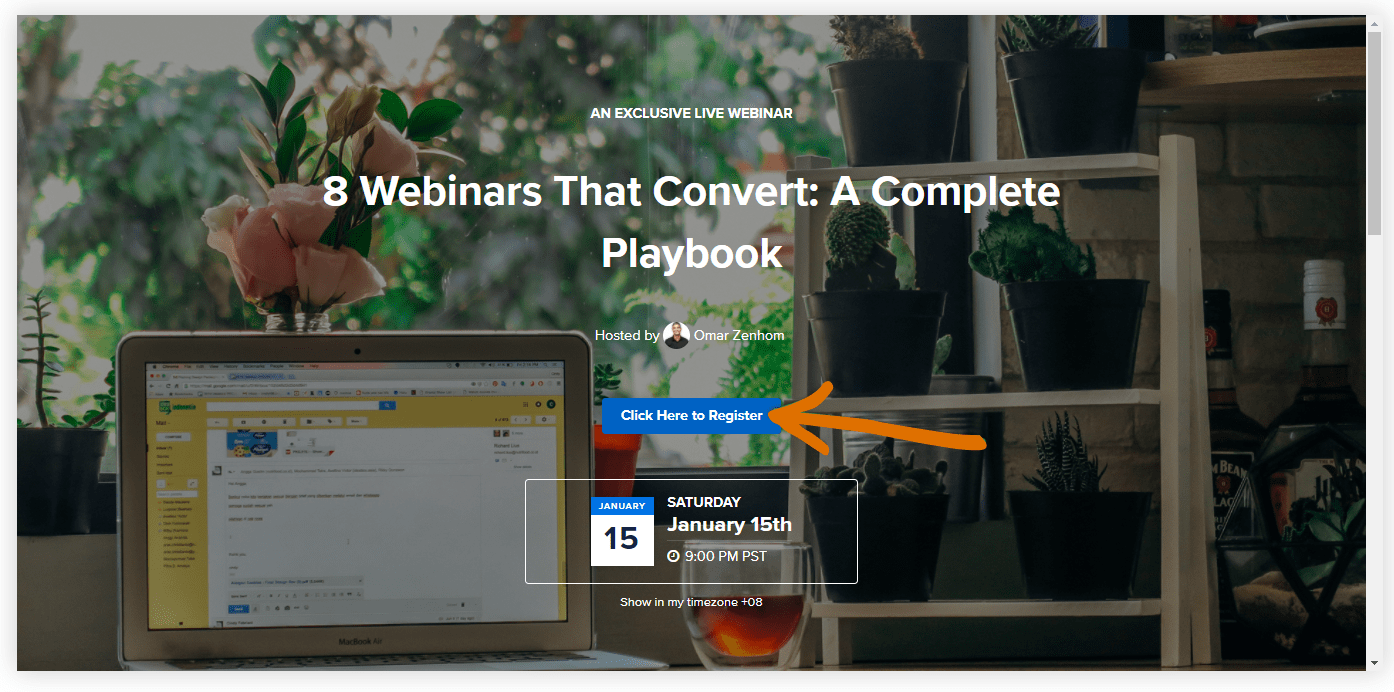
Step #2: Create a Webinar Registration/Landing Page
Compelling and straightforward – that’s how you need to shape your webinar registration or the landing page. After all, it’s the first touchpoint with potential attendees, so make it count.
Let’s not waste a moment and discuss the key elements of a successful webinar registration page –
- Headline & Subhead: Start with a persuasive headline that clearly states the webinar’s main benefit. Follow with a subheadline that provides additional context.
- Details: Include essential details like the topic, date, time, and duration. Be specific to avoid any confusion.
- Description: Write a brief but engaging description of what attendees will learn. Highlight key takeaways and benefits.
- Speaker Information: Introduce the speakers with a short bio and photo. This adds credibility and gives a face to the names.
- Call to Action: Make the registration button prominent and easy to find. Use action-oriented text like “Register Now” or “Save Your Spot.”
- Form Fields: Keep the registration form short to avoid deterring sign-ups. Typically, name, email, and one or two additional fields should suffice.
Step #3: Set up Email Campaigns
A lot of individuals and businesses tend to mess up this part of the webinar preparation checklist. Everyone knows that nurturing registrants from the moment they sign up is crucial to preserving their attention, but how exactly?
You need to create a strategic timeline to convey valuable information and reminders at key intervals. Here’s how to plan your email strategy –
- Initial Announcement: Email your entire mailing list to announce the webinar. Include key details from your registration page and a clear call to action.
- Reminder Emails: Plan a series of reminder emails leading to the webinar. Typically, you’ll want to send reminders at the 2-week, 1-week, 3-day, and 1-day marks.
- Content Teasers: To build anticipation, include snippets or teasers of what will be covered in the webinar. You can also highlight any special guests or unique segments.
- Confirmation Email: Immediately after someone registers, send a confirmation email with details on how to join the webinar and any materials they might need.
- Personalization: Where possible, personalize your emails with the recipient’s name and any other relevant details. Personalized emails have higher open and engagement rates.
Step #4: Design Promotional Materials
Words alone can’t captivate your target audience. Your marketing campaigns must have eye-catching graphics, banners, and other visual elements. Consistent branding across all materials will help build recognition and trust.
Create a visual theme that reflects your brand identity and the topic of your webinar. You can use high-quality images, bold typography, and a consistent color scheme across all promotional materials.
Design social media graphics, email headers, blog post images, and banners that can be easily customized for different platforms. Test different visuals to see what resonates best with your audience and refine your materials accordingly.
3 Weeks Before Your Webinar
The Promotional Phase
Three weeks to go, and it’s time to shift gears from meticulous planning to generating excitement. It’s time you ignite the spark and build anticipation for your webinar. How? That’s what I’m about to share in the following section –
Step #1: Start Promoting Your Webinar (& Boost It)
It’s time to begin your promotional activities. You can use a mix of organic and paid strategies to reach a broader audience. And the first stage for that?
- Send out Initial Emails
Send an email to your entire mailing list announcing the webinar. The motive is to highlight the key benefits of attending – including what they will learn and any exclusive content or offers. Make sure the call to action (CTA) is clear and compelling.
- Social Media Campaigns
Spread the word about your webinar on social media platforms. Share engaging content related to your webinar topic, use eye-catching graphics, and create countdown posts to build anticipation. You can also set countdown timers on the webinar registration page.
- Leverage Paid Ads
Consider running paid ads on platforms like Facebook, LinkedIn, and Google to reach a wider audience. What’s better is that you can target these ads based on demographics, interests, and behaviors that align with your ideal audience.
- Webinar Teasers
You must have seen teasers of your favorite movies. Notice how they create a sense of excitement just by sharing snippets of the entire content? That’s exactly what you can do for your webinar.
To generate excitement, share short teaser videos or behind-the-scenes content. Highlight key speakers, share interesting snippets from your presentation, or reveal exclusive content that will be covered.
- Engage With Your Registrants
Respond to comments, answer questions, and participate in relevant conversations to actively engage with your social media followers. This can increase your visibility and encourage more sign-ups.
Step #2: Prepare Interactive Elements
What type of interactive elements do you wish to include? You can choose from different options such as polls, Q&A sessions, or breakout rooms.
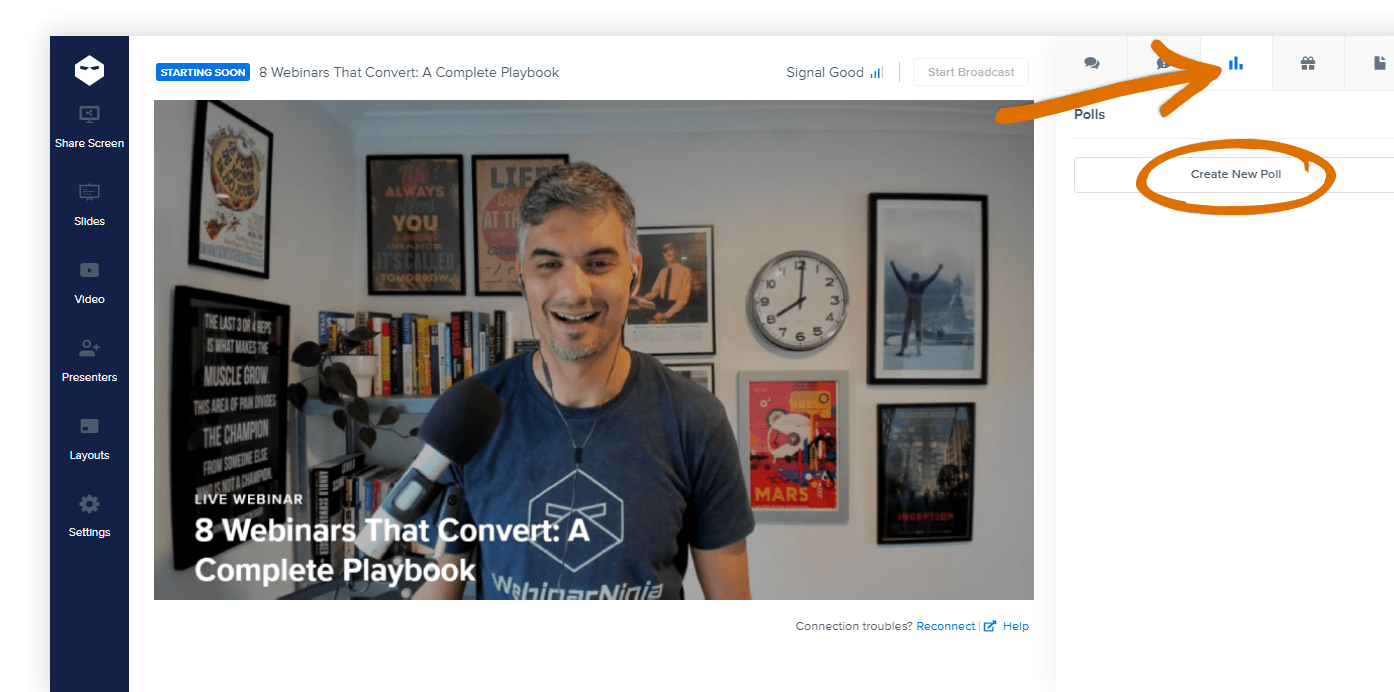
Interactive elements are key to keeping your audience engaged. These can be used to gauge attendee opinions, test knowledge, or gather feedback. Prepare a set of thought-provoking questions for the Q&A session, and allocate specific time slots for this interaction.
Step #3: Rehearse Your Webinar
It’s important to rehearse your presentation multiple times and familiarize yourself with the webinar platform’s features so that you can use them seamlessly.
Practice using features like screen sharing, switching between presenters, and handling attendee questions. Assign roles clearly among your team – who will handle technical issues, moderate the chat, or facilitate the Q&A session. You may record your rehearsals to review later.
I’d recommend conducting at least two full rehearsals with your team. These should be as close to the live event as possible, including all interactive elements like polls and Q&A sessions. Time each section to ensure you stay within your planned duration.
Step #4: Secure a Backup Plan
Technology is unpredictable. It’s a wise idea to have a backup plan in place in case of sudden tech snags. This could include a secondary internet connection, an alternative platform, or pre-recorded content.
Securing a backup plan is more like a risk mitigation strategy in project management. You need to identify potential technical issues that could disrupt your webinar and plan contingencies for each.
Pre-record your presentation as a failsafe. This way, even if a live broadcast becomes impossible, you can still deliver the content. Inform your audience about the backup plan to manage their expectations in case of any disruptions.
2 Weeks Before Your Webinar
The Final Phase
As registrations pour in, you know you’re closer than ever. This phase has little to do except ensure everything is going smoothly. I’ll try to wrap up this phase quickly to skip to the next phase.
Step #1: Automate Reminder Emails
Schedule reminder emails for one week, three days, and one day before the webinar. These reminders should reiterate the value of attending and provide all necessary details, including the link to join.
Check this to have a rough idea about how to automate these reminders –
- Two-Week Reminder: Reiterate the webinar’s date, time, and topic. Include a brief agenda or key takeaways to highlight what attendees can expect.
- One-Week Reminder: Provide materials the target audience might need, such as a workbook, slides, or reading materials. This is also a good time to share a personal message from the speaker to build anticipation.
- Day-Before Reminder: Include the link to join the webinar, instructions on how to log in, and any last-minute details.
Step #2: Confirm Speakers & Roles
- Sorry mate, I got caught up with something very important…can’t join our webinar, this time around. – guest speaker.
- Guys, I’ll join a bit late…gotta bail out my dad and pet dog from the cops. – moderator.
Yes, that’s how you would react to these texts (hope you don’t need to, haha). Needless to say, confirmation from everyone is a crucial part of the webinar checklist to avoid situations like this in the end.
Ensure all speakers and team members are clear on their roles and responsibilities. Contact each of them to confirm their participation and review their roles. Provide them with a detailed agenda, including the timing of their segments and any interactive elements they will be involved in.
Step #3: Prepare Your Environment
You need a professional and distraction-free environment for your webinar. Not even for a few seconds can you afford to have external disturbances. Here’s a to-do list to make that possible if you’re going to participate from your home/office –
- Choose a Quiet Location: To minimize disruptions, select a quiet room where you won’t be interrupted. Inform others in your household or office about the webinar.
- Lighting: Ensure your space is well-lit. Natural light is ideal, but if that’s not possible, use lamps or other light sources to ensure your face is clearly visible.
- Background: Keep your background professional and free of distractions. A plain wall, a tidy bookshelf, or a branded backdrop works well. Avoid clutter and personal items.
- Comfort: Make sure you’re comfortable in your space. Have a comfortable chair, a glass of water, and any notes or materials you might need within reach.
- Tech: Test your microphone and speakers to ensure clear audio. Consider using a high-quality external microphone and headphones to minimize feedback and background noise.
Step #4: Create a Pre-Webinar Survey
Haven’t you wondered what your registrants expect from the webinar? Well, collecting feedback from current registrants is a great way to pinpoint attendee pain points, understand their goals, and identify the most effective promotion channels.
But, you may ask – Isn’t it too late for all these?
Well, no. That’s because the responses are less likely to be something out of the world if you follow all the previous steps. Now, here are three questions you can include in your pre-webinar survey:
- Why is the webinar topic important to you?
- What motivated you to sign up for this webinar?
- How did you learn about this webinar?
Day-of-Webinar Checklist: Lights, Camera, Action!
Congratulations! You’re at the end of the tunnel, and if you have followed everything so far – you’re likely to have nothing more to procrastinate on.
The emails you automated will reach their destinations, and registrants will be notified about the event timings. In case you fear emails will remain unopened, you may create a social media post.
I’d suggest you conduct a final run-through: Checking the internet connection of everyone involved, and ensuring the visual and interactive elements are good to go.
Now, I’m about to tell you something raw (from my experience). Don’t fret if a certain section of the audience doesn’t convert. It’s normal. But don’t give up. Instead, encourage them to attend future events. You can attach links to an eBook, offer discount codes, or use other CTAs.
Tips & Tricks for the Day-of-Webinar
Alright! Let’s check some of the top tips and tricks professionals follow for the big day –
- Log in to your webinar platform at least an hour before the start time. This allows you to address any last-minute technical issues and ensure everything is ready.
- Ensure your webinars are easily accessible to everyone. It should cater to varying levels of tech proficiency.
- If your webinar is free for all, you can upload stories on your Facebook, Instagram, or LinkedIn with a redirecting link to join the webinar.
- Welcome your attendees warmly as they join. Play background music or show a welcome slide with key information and the agenda. This sets a positive tone and keeps attendees engaged while they wait.
- Keep an eye on attendee engagement throughout the webinar. Use interactive features like polls and chat, and encourage participation by asking questions and prompting responses to maintain engagement.
- Stick to your schedule. Allocate specific times for each section of your presentation and stick to them. This shows respect for your attendees’ time and keeps the event running smoothly.
During-Your-Webinar Checklist: The Final Showdown
During the webinar, it’s all about delivering value and keeping your audience engaged. It’s also about gracefully handling unforeseen events like tech issues without hampering the audience’s spirit.
Step #1: Welcome Attendees
Start by welcoming everyone and giving a brief overview of what to expect.
Here’s your to-do list in a nutshell –
- Opening Greeting: Begin with a warm and enthusiastic greeting. Thank attendees for joining and express your excitement about the session.
- Overview of Agenda: Provide a quick rundown of the webinar’s agenda. Highlight key topics, the session’s structure, and any planned interactive elements.
- Housekeeping Notes: Mention any important housekeeping details, such as how to ask questions, use chat features, or access additional resources.
Introduce yourself with a brief background that establishes your expertise and relevance to the topic. If there are other speakers, introduce them as well.
This builds trust and sets a professional tone. Make sure to thank attendees for joining and encourage them to participate actively.
Step #2: Engage Right Away
I’ve seen many webinar hosts make this common mistake. They believe engaging the audience is only required after a certain time. Not the right approach, mate.
The moment the webinar kicks off – maintaining engagement is crucial to its success. Here are some quick tips and suggestions –
- Start with an icebreaker poll to get the audience involved right away.
- Integrate interactive elements such as live polls throughout the presentation to keep interest levels high.
- Allocate specific times for Q&A sessions where attendees can ask questions and receive real-time answers.
- Use the live chat feature to address comments and foster a sense of community.
- Encourage attendees to share their thoughts and experiences, making the session more interactive and dynamic.
| Pro Tip: Remember to record your webinar. This gives you a great chance to promote future events by cropping interesting moments and snippets and posting them on social media. Use a tool that offers automatic recording. |
Also Read: How to Make Your Webinars Interactive & Engaging
Step #3: Close With a Strong CTA
End your webinar with a clear call to action. This could be signing up for a newsletter, downloading a resource, or scheduling a consultation. Provide clear instructions on the next steps.
A strong conclusion leaves a lasting impression and ensures that your webinar not only informs but also drives further engagement. Summarize the key points covered during the webinar and thank the audience for participating.
Post-Webinar Checklist: How to Wrap Things up After a Webinar
The webinar might be over, but your work isn’t done yet. From checking statistics to prepping for future events – there are a lot of things to do.
Following these steps will help you capitalize on the momentum and ensure your efforts translate into tangible results –
Step #1: Analyze Webinar Stats
The first thing you should do after your webinar ends is head to the reporting and analytics section. Most webinar platforms have such a tool, where you can get a clear idea of –
- Unique visits
- Total registrants
- Attendees who joined
- Attendees who replayed the webinar
- Conversion rates
- Engagement rates, etc.
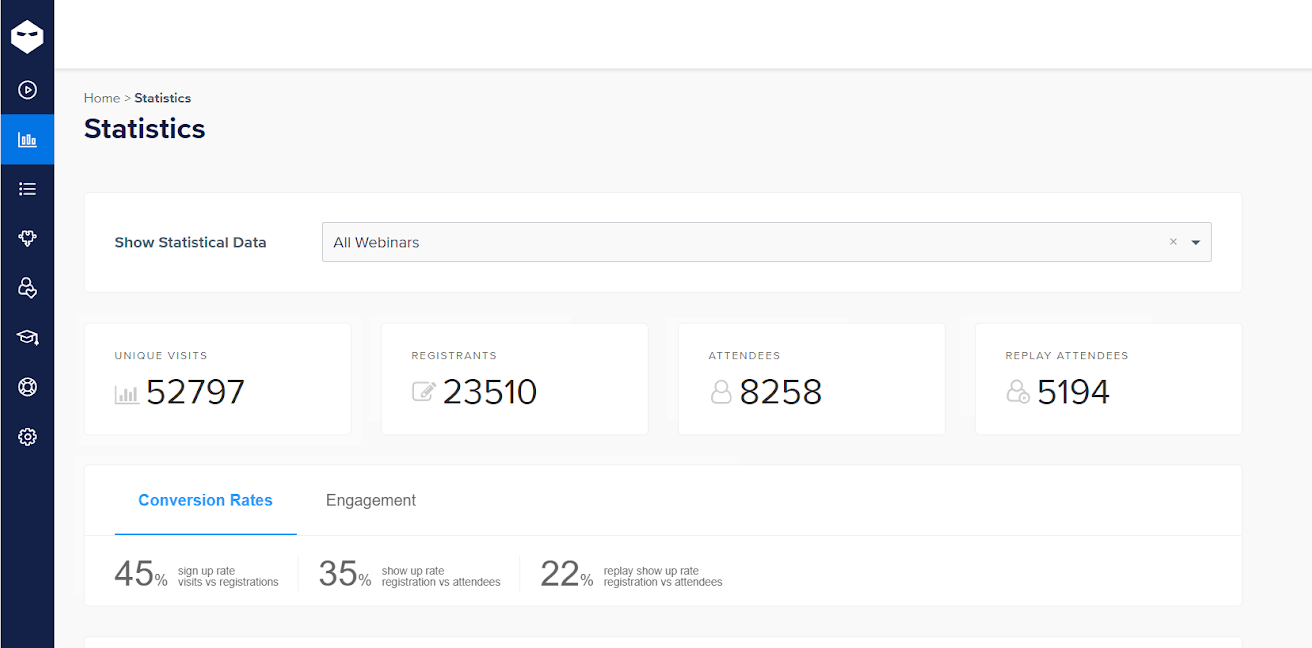
Evaluating these numbers gives you a better idea of how your webinar performed. It also gives you a clear estimate of whether the topic you chose or the target audience was at all the right choice. These ensure that you learn from the first gig and prepare for upcoming events in the right way.
Want to know more? Watch this video –
Step #2: Send a Thank-You Email
You need to make conversions, don’t you? Sometimes, the webinar session may not be enough to make the audience make the decision. That’s why reaching out to everyone is crucial for maximizing lead generation or conversion.
You need to divide your email sequence into three groups –
- The absentees: First things first, target those who accepted the webinar invitations but didn’t show up. Send them a link to the recorded version of your webinar and sum up what happened in bullets.
- The early exits: You’ll find a lot of people who joined on time but left before the webinar was concluded. You can send them snippets of what happened after they left or send a replay link to the webinar if they want to see what they missed.
- The finishers: Keep a clear record of people who watched the entire webinar. These people will most likely convert and deserve more than a thank-you email. It’s better to let your sales and marketing teams nurture them.
| Pro Tip #2: Segment your leads based on their engagement and interaction during the webinar. High-engagement attendees should be prioritized. Reach out with personalized messages that reference their participation and interest areas. Add new leads to your email nurturing campaigns. |
Step #3: Conduct a Post-Webinar Survey to Gather Feedback
You can send a post-webinar survey to the audience who joined. This will help you systematically gain a clear understanding of your webinar’s impact. Ask questions like –
- How satisfied are you with the webinar?
- Did the webinar meet your expectations?
- How can we improve?
Examine survey results for quantitative data on attendee satisfaction and qualitative comments for more detailed insights. Use this feedback to pinpoint areas for improvement and strengths to build on. This analysis is critical for refining your approach and enhancing future webinars.
Complete Your Webinar Checklist With WebinarNinja
Webinars are powerful, but they shouldn’t feel rigid or scripted. Infuse your personality, inject humor where appropriate, and allow for some organic interaction with your audience.
Following a well-organized webinar checklist can prevent the last-minute rush. When everyone knows what happens at each step, they become more confident in navigating the planning and preparation stages and nailing the event.
Here’s a quick recap of the webinar planning checklist that you just read in the blog –
Equally important is having the right tools at your disposal. When you choose a trusted and reliable webinar platform like WebinarNinja, you pave the way for a seamless and rewarding experience.
From creating engaging registration pages to hosting interactive webinars and collecting feedback, WebinarNinja goes above and beyond. Don’t take my word – request a demo, or even better – try it yourself for free.
Want to host a webinar for free?
Use WebinarNinja to teach, improve marketing, and grow your sales.